

Understanding AI Music Videos Before You Start
Imagine turning a finished track into a polished music video without hiring a director, renting a camera, or spending weeks in post-production. That scenario used to require a production budget that most independent creators simply did not have. AI music video generators have changed that equation entirely, making it possible for a solo artist to go from song to screen in an afternoon rather than a month.
The catch? Most AI-generated videos still look obviously artificial. Flickering scenes, disconnected visuals, and a generic quality that screams "a computer made this." The difference between a forgettable AI clip and a video that actually supports your music comes down to understanding the full creative pipeline, not just which button to click.
This guide covers that entire pipeline, from concept planning and prompt writing to generation, editing, and publishing. It is tool-agnostic by design, teaching you the principles that work across any platform so you can create music video with AI that feels intentional rather than randomly assembled.
What Are AI Music Videos and Why They Matter
An AI music video is any visual accompaniment to a song where artificial intelligence handles a significant portion of the creative generation. That could mean an AI model producing every frame from a text prompt, or it could mean using AI to generate individual scenes that a human editor then assembles and refines.
Why do they matter? Because visual content is no longer optional for musicians. Streaming platforms and social algorithms heavily favor video over audio-only releases. Artists who release tracks without visual accompaniment are leaving engagement and discoverability on the table. AI tools eliminate the production bottleneck that once sat between a finished song and a proper visual release, letting you make a music video with AI at a pace that matches modern release cycles.
Three Approaches to AI Music Video Creation
Not every AI music video follows the same workflow. The approach you choose depends on whether you already have a song, how much creative control you want, and how polished the final result needs to be. Here are the three main paths:
- Fully AI-generated music and video. Both the song and the visuals are created by AI tools. You provide text prompts describing the genre, mood, and visual style, and AI handles everything from composition to rendering. This works well for content creators who need original background music paired with visuals for social posts or ambient content.
- Existing music with AI-generated visuals. You upload a finished track (your own song, a licensed beat, or an AI-generated composition) and use an AI video generator to produce visuals that sync to the audio. This is the most common approach for musicians who want to create ai music videos for their existing catalog.
- Hybrid workflows combining AI with manual editing. AI generates raw visual scenes or clips, which you then import into editing software like DaVinci Resolve or CapCut to trim, reorder, add transitions, and fine-tune audio-visual sync. This approach produces the most polished results and is how most professional-looking AI music videos are actually made.
Each approach involves different tools, different skill levels, and different time investments. The hybrid method requires more hands-on effort but consistently produces output that does not look AI-generated, which is the goal.
Who This Guide Is For
This guide is written for three audiences. Independent musicians who want visual content for every release without the cost of traditional production. YouTubers who need how to make a music video with ai for channel content, lyric videos, or visualizers. And social creators on TikTok, Instagram, and Shorts who need eye-catching video paired with trending audio to grow their audience.
You do not need video editing experience to follow along, though having basic familiarity with any editing tool will help during the post-production steps. What matters most is a willingness to iterate. The creators getting the best results from AI video generation treat these tools as collaborators rather than vending machines, and that mindset starts with understanding exactly what you want before you generate a single frame.
Step 1 Plan Your Visual Concept and Style Direction
The single biggest quality lever in any AI music video is the visual style you choose before you generate anything. Skipping this step is why most AI videos look generic. You end up with a random collection of scenes that have no relationship to the song's mood, genre, or emotional arc. Fifteen minutes of planning can save hours of regeneration and produce results that actually feel like a deliberate creative choice.
Match Your Visual Style to Your Music Genre
Every music genre carries visual expectations that audiences recognize instinctively. When you align your video's look with those expectations, the result feels intentional rather than randomly assembled. When you fight against them without a clear reason, it just looks like the AI picked the wrong reference material.
Think about how different genres naturally pair with different visual languages. Electronic and synthwave music benefits from abstract geometry, neon color palettes, and fluid motion. Hip-hop and rap connect with urban cinematics, high-contrast grading, and gritty street-level footage. Indie folk works with warm, organic textures, natural landscapes, and soft lighting. Metal and hard rock pair with dark, high-contrast imagery, dramatic angles, and chaotic visual energy. Lo-fi and ambient tracks shine with minimalist animation, muted tones, and slow, meditative camera movement.
These pairings are not rules. They are starting points. The goal is to make a conscious decision about how to create a song video that supports rather than distracts from the music. If you want to subvert genre expectations, do it intentionally with a clear aesthetic reasoning behind the contrast.
Decide Your Video Format
Beyond overall visual style, you need to pick a video format. This decision shapes everything downstream, from the prompts you write to the editing approach you take. Here are the main options:
- Lyric video - Text-driven visuals where lyrics appear on screen, synced to the vocals. A lyrical video maker approach works well for vocal-heavy tracks and is one of the easiest formats to produce with AI since text overlays can be added in post.
- Narrative video - A story unfolds across the song's duration, with characters, settings, and a plot arc. This format demands the most consistency from AI tools since characters and locations need to stay recognizable across scenes.
- Abstract/visualizer - Non-representational motion graphics, patterns, or shapes that respond to the music's energy. Ideal for instrumental tracks and electronic genres where the visuals enhance the listening experience without competing for attention.
- Performance video - Simulated footage of an artist or band performing the song. Harder to pull off with current AI tools due to human figure consistency issues, but improving rapidly.
- Anime/illustrated style - Stylized animation inspired by Japanese anime or Western illustration. An anime music video maker workflow produces some of the best-looking AI results because stylized output hides AI artifacts more effectively than photorealistic attempts.
If you are wondering how can i make a video with music when you have zero production budget, the abstract and anime formats give you the highest quality-to-effort ratio. They are forgiving of AI inconsistencies and look polished even without heavy post-editing, which means you can effectively create a music video free of the typical AI tells that plague more realistic formats.
Gather Inspiration and References
Before touching any generator, collect five to ten reference images or video clips that represent the look you want. These could come from existing music videos, film stills, art portfolios, or even screenshots from games. Having concrete references does two things: it gives you precise language for your prompts later, and it provides a benchmark for judging whether generated output is hitting the mark or drifting off-target.
Save these references in a single folder. Note what specifically you like about each one. Is it the color palette? The camera angle? The lighting quality? The more specific your observations, the more effectively you will translate them into prompts that AI tools can actually interpret, which is exactly where the next step picks up.
Step 2 Prepare Your Music and Audio Files
Your visual references and style direction are locked in. The next piece of the puzzle is the audio itself, because the quality and format of your music file directly affects how well AI video generators can analyze your track and produce visuals that actually sync to it.
Select or Generate Your Music Track
You have three paths to get source audio into your workflow. The first is the most straightforward: upload a finished song you already own. If you have a mixed and mastered track sitting in your DAW or downloads folder, that is your best starting material. WAV or FLAC files preserve the most detail, while a 320kbps MP3 works perfectly for most generators.
The second path is generating music with AI. Tools like Suno, Udio, and Stable Audio let you create original tracks from text prompts describing genre, mood, instrumentation, and tempo. If you are wondering how to use Suno AI for free, the platform offers a free tier with enough credits to generate several songs directly in your browser, no installation required. Communities on Reddit frequently discuss which platforms deliver the best results, and threads about the best ai music generator reddit and ai song generator reddit consistently highlight Suno and Udio as leading options for quality vocals and instrumentation. For creators who need to know how to create background music for video without licensing headaches, AI-generated tracks sidestep traditional copyright entirely since you own the output under most paid plans.
The third option is pulling existing tracks from platforms like SoundCloud or YouTube, though this requires you to hold proper rights or licenses for the music. Never use copyrighted audio without permission, even for AI-generated visuals.
The fully end-to-end AI pipeline, where both music and video are generated from text prompts, is becoming increasingly viable. You can prompt Suno to generate video assets alongside your track, or feed an AI-generated song directly into a separate video generator. Discussions around music ai creator without copyright restrictions reddit reflect growing interest in this complete pipeline approach, where a single creator produces an entire audiovisual release without licensing a single asset.
Optimize Audio Files for AI Video Tools
Garbage in, garbage out. A poorly formatted audio file leads to missed beat detection, broken section analysis, and lip-sync failures. Most AI video generators accept MP3, WAV, AAC, M4A, FLAC, and AIFF, but how you prepare the file matters more than the format itself. Follow this checklist before uploading:
- Export from your best source. Use WAV or FLAC when possible. Converting a low-bitrate MP3 to WAV does not restore lost quality.
- Avoid clipping and distortion. If your master is constantly hitting 0 dB, the AI's section detection and vocal recognition become less reliable.
- Keep vocals clear in the mix. Heavy reverb, vocoder effects, or dense layering can reduce lip-sync accuracy if you plan to use that feature.
- Trim dead silence. Empty intros and outros still consume generation time and credits without producing useful visuals.
- Check file size and duration. Most platforms cap uploads between 100 MB and 5 minutes. For longer songs, render your strongest section first.
- Decide your aspect ratio early. Choose 16:9 for YouTube or 9:16 for TikTok and Reels before generation, since changing orientation later requires a full re-render.
Leverage Platform Integrations for Source Music
Some AI video generators integrate directly with music creation platforms, eliminating the export-then-upload step entirely. Suno generate video capabilities allow Pro users to export songs as video assets without leaving the platform. Canva's ai music generator provides royalty-free background tracks that can be paired with its built-in video editing tools. Other platforms like music gpt free alternatives let you generate short musical ideas that can serve as source material for quick social content.
These integrations save time, but they also limit your creative control over both audio quality and visual direction. The cleanest workflow for serious projects remains exporting a high-quality audio file from your source and uploading it to a dedicated video generator where you control every parameter. That clean, well-formatted file becomes the foundation for everything that follows: the prompts you write, the scenes the AI generates, and how precisely those visuals lock to your music's rhythm and structure.
Step 3 Write Prompts That Produce Stunning Visuals
Your audio file is clean, your style direction is set, and your references are collected. Here is where all that preparation pays off. The text prompt you feed an AI video generator is the single most influential factor in output quality. A well-written prompt does not just describe what you want to see. It tells the AI how to see it: the camera behavior, the lighting, the motion, and the emotional tone that makes visuals feel connected to music rather than randomly generated.
Most creators type something vague, get mediocre results, and blame the tool. The problem is almost always the prompt. Whether you are using Adobe Firefly AI text to video, LTX Studio, or any other generator, the principles below apply universally because every model interprets the same core elements: subject, setting, motion, style, and camera.
Anatomy of a High-Quality Video Prompt
Think of a video prompt like a brief you would hand to a cinematographer. You would not just say "film something cool." You would describe the scene, the mood, and how the camera should move. AI models need the same level of direction.
A strong music video prompt contains five core components, layered in a logical order:
- Subject and setting. What is in the frame and where? Be concrete. "A woman" is vague. "A woman in a flowing red dress standing on a rain-soaked rooftop" gives the AI a clear visual anchor.
- Action and motion. What happens over the clip's duration? Video prompts must describe temporal change. "She turns slowly toward the camera as wind lifts her hair" tells the AI what to animate.
- Camera movement. How does the viewer experience the scene? Use cinematographic language: slow dolly in, tracking shot from behind, static close-up, pan left to reveal. Models trained on film data respond strongly to these descriptors.
- Lighting and atmosphere. Soft golden hour light, harsh overhead spotlight, volumetric fog with backlighting. Lighting shapes mood more than any other element, and AI models reliably interpret lighting instructions.
- Style and mood keywords. Cinematic, surreal, lo-fi, noir, anime, dreamy, aggressive. These modifiers influence color grading, pacing, and overall aesthetic treatment.
The order matters. Civitai's prompting guide recommends structuring video prompts with 60 to 100 words, writing events in the order they should appear on screen. This chronological approach helps the model maintain coherence across frames rather than averaging competing signals into a static mess.
Prompt Examples for Different Music Genres
Generic prompts produce generic output. Music videos demand prompts tailored to the emotional register of the song. Here are genre-specific examples you can adapt:
Electronic/Synthwave:
A neon-lit corridor stretches infinitely forward. Geometric light panels pulse in rhythm along the walls. The camera performs a smooth dolly-in through the corridor, accelerating gradually. Volumetric purple and cyan light fills the space. Cyberpunk aesthetic, 4K resolution, cinematic color grading in teal-magenta tones.
Indie Folk:
A lone figure walks through a misty meadow at dawn. Tall grass brushes their outstretched fingertips. The camera tracks alongside them from a low angle as soft golden light filters through the haze. Shot on 35mm film with natural grain, warm tones, shallow depth of field. Peaceful, contemplative mood.
Hip-Hop:
Close-up of hands gripping a microphone under harsh stage lighting. The camera slowly pulls back to reveal a performer on a dimly lit stage, silhouetted by a single overhead spotlight. Smoke drifts through visible light beams. High contrast, dramatic shadows, gritty urban tone.
Metal/Hard Rock:
A wide-angle shot of a band performing in an abandoned warehouse. Sparks fly from the ceiling as strobe lights flash rapidly. The camera crashes forward toward the lead guitarist in a fast dolly move. Hard directional lighting, deep shadows, chaotic and explosive energy. Fisheye lens distortion, high intensity.
Notice how each prompt specifies not just what is in the scene, but how it moves and how it feels. That layering of subject, motion, camera, lighting, and mood is what separates prompts that produce visuals worth using from prompts that waste your generation credits. You can even adapt this structure as a music video prompt generator template, swapping elements to match your specific track.
Common Prompt Mistakes to Avoid
The gap between a mediocre clip and a usable one almost always traces back to one of these errors:
Treating video prompts like image prompts. A prompt like "beautiful landscape, cinematic, 8K" works fine for a still image. For video, it produces a static scene with no motion or purpose. You need temporal structure: what happens first, what changes, and how the camera responds. LTX's prompting research confirms that video models are highly sensitive to this distinction, producing predictable failure modes when given image-style prompts.
Overloading with conflicting descriptions. Asking for "fast action with slow motion and dramatic freeze frames" forces the model to average competing signals. Pick one motion style per clip. If you need variation, generate separate clips and combine them in editing.
Being too abstract. "A nice vibe that matches my song" gives the AI nothing to work with. Replace evaluative language with concrete visual details. What does that "vibe" actually look like? Warm sunset light? Underwater refraction? Rain on glass?
Ignoring camera direction. Without camera instructions, most models default to a generic mid-level static shot or gentle drift. If you want to add a background to a band video with AI and have it feel dynamic, you need to specify exactly how the camera behaves: "low-angle tracking shot following the drummer" versus just "a band playing."
Here is a side-by-side comparison showing how specificity transforms output quality:
| Weak Prompt | Strong Prompt | Expected Output Difference |
|---|---|---|
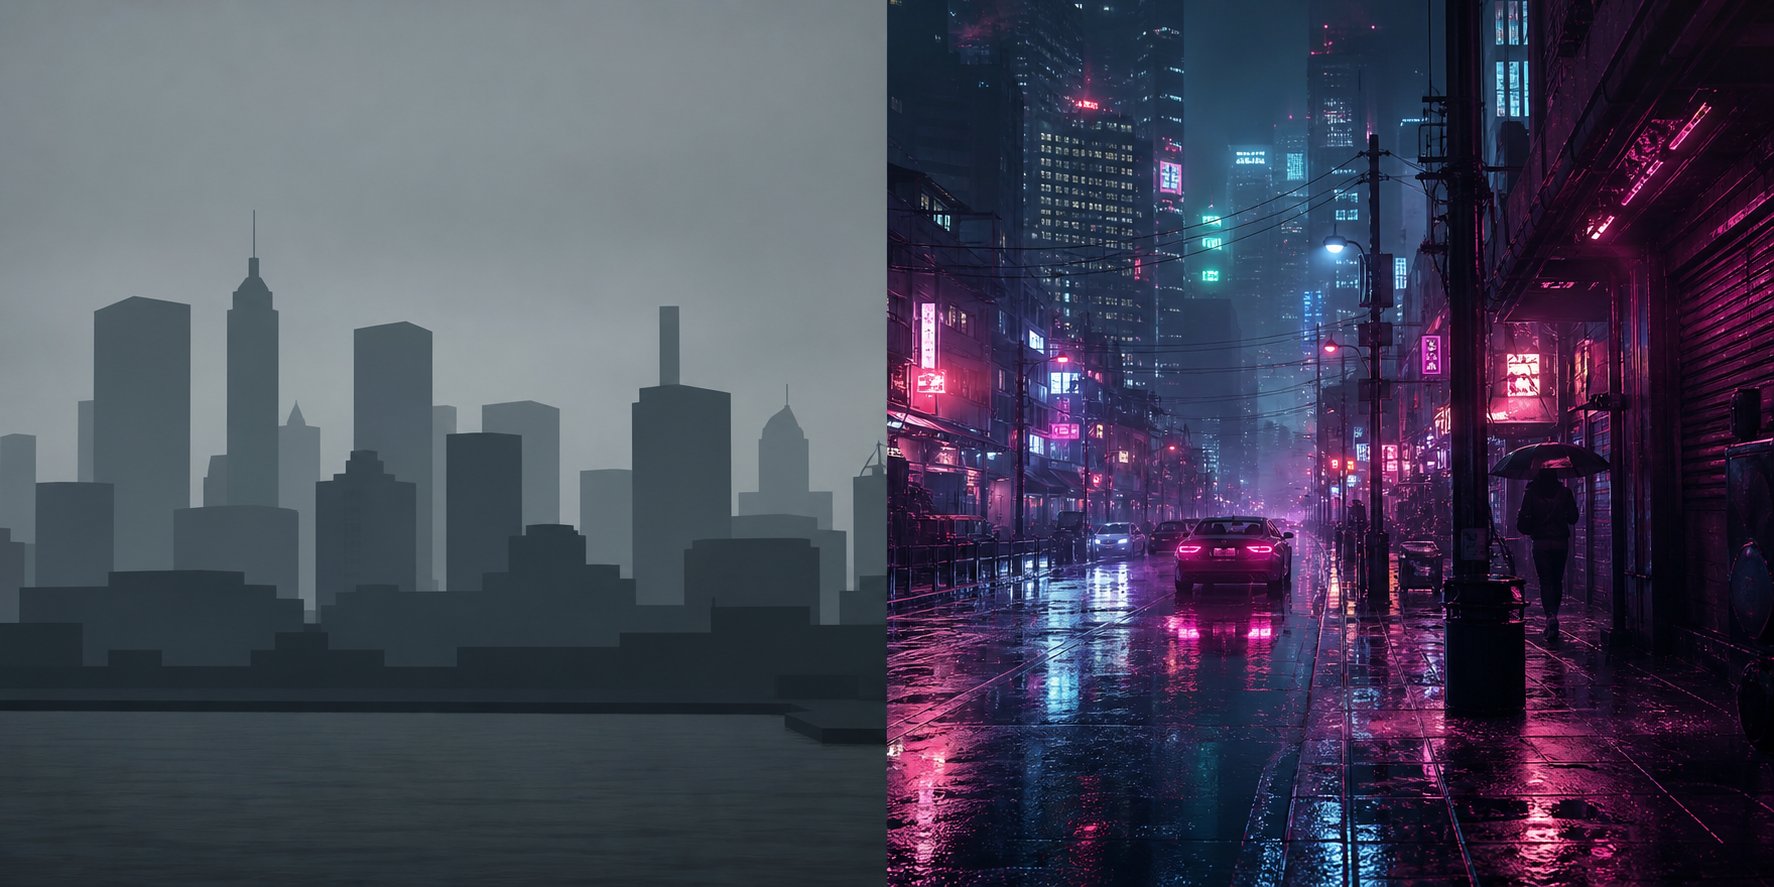
| A city at night with lights | A rain-soaked city street at midnight. Neon signs reflect in puddles. The camera slowly pans right at street level. Volumetric fog, shallow depth of field, moody noir atmosphere. | Static skyline vs. immersive street-level scene with purposeful motion and atmosphere |
| A singer performing on stage | Close-up of a singer's face lit by a single warm spotlight. Camera holds static as they sing with eyes closed. Soft lens flare, shallow focus, intimate concert tone. | Generic wide shot vs. emotionally resonant close-up with controlled lighting |
| Abstract colorful visuals for electronic music | Geometric light panels morph and pulse in sequence through a dark void. Colors shift from deep blue to electric magenta. Camera pushes forward slowly through the structure. Smooth motion, clean lines, futuristic visualizer aesthetic. | Random swirling colors vs. structured motion design with clear visual rhythm |
| Nature video for a chill song | A misty mountain lake at dawn. A lone canoe drifts slowly across the still water. The camera performs a gentle aerial descent toward the surface. Soft diffused light, muted earth tones, peaceful and meditative. | Stock-footage-looking landscape vs. cinematic scene with subject, motion, and mood |
The pattern is clear. Specificity in subject, motion, camera, and lighting consistently produces output that looks directed rather than randomly generated. Most tools, from Adobe AI text to video platforms to open-source models, respond to the same underlying principles because they were all trained on similar film and video data.
One final tip: keep each prompt focused on a single continuous shot. If your music video needs ten scenes, write ten separate prompts rather than cramming an entire narrative into one. Generate individual clips, then assemble them in editing. This approach gives you far more control and avoids the visual incoherence that plagues multi-scene single-prompt attempts. That assembly process is where your tool choice starts to matter, which is what the next step addresses directly.
Step 4 Pick the Right AI Music Video Generator
Your prompts are written, your audio is prepped, and your visual concept is clear. The question shifts from "what do I want?" to "which tool actually builds it?" The AI video generation landscape is crowded, and not every platform treats music the same way. Some analyze your track's BPM and structure. Others generate beautiful clips that have never heard your song. Choosing the best ai for making music videos depends on what you need: a one-click workflow from song to video, cinematic clip-level control, or something in between.
Here is a breakdown of the leading platforms, evaluated on what matters most to musicians and creators: audio integration, output quality, pricing, duration limits, and workflow efficiency.
Top AI Music Video Generators Compared
The table below compares the platforms you are most likely to encounter when searching for a free ai music video generator or a paid professional option. Each tool occupies a different niche, and understanding those differences prevents wasted credits and frustration.
| Tool | Supported Inputs | Audio Sync | Max Video Length | Starting Price | Best For |
|---|---|---|---|---|---|
| MakeBestMusic | MP3, WAV, text prompt | Yes - audio-driven | Full song length | Free tier available | Musicians and social creators who want to turn existing songs into visual content quickly without editing skills |
| Freebeat | MP3, WAV, Suno/Udio links, YouTube/SoundCloud URLs | Full BPM + structure analysis | 6 minutes | $4.99/week | Indie artists needing complete, platform-ready videos with lip sync and character consistency |
| LTX Studio | Text prompts, reference images | None | Multi-scene (short clips) | Free tier available | Narrative storyboarding and text-driven video projects where music sync is not required |
| Adobe Firefly Video | Text prompts, image references | None | ~5 seconds per clip | Included with Creative Cloud | Designers already in the Adobe ecosystem who need individual cinematic clips |
| One More Shot AI | MP3, text prompt | Basic beat detection | ~3 minutes | Free tier with limits | Quick social clips and visualizers for emerging artists on a tight budget |
| Runway Gen-4 | Text prompts, images | None | ~10 seconds per clip | $15/month | Filmmakers and editors who want top-tier clip quality and handle assembly manually |
| Kling AI | Text prompts, reference images | None | 2 minutes | $10/month | Creators who need photorealistic footage and have an existing editing workflow |
A few patterns emerge immediately. Tools built specifically for music production (MakeBestMusic, Freebeat, One More Shot AI) accept audio input and attempt to sync visuals to the track. General-purpose generators like Runway, Kling, and Adobe Firefly produce higher-fidelity individual clips but require you to handle all timing and assembly yourself. That distinction, music-first versus video-first, is the most important decision in your entire workflow.
Which Tool Fits Your Workflow
Your choice depends on two factors: your editing skill level and how much time you want to spend in post-production.
If you want to upload a song and receive a finished video with minimal manual work, MakeBestMusic's AI Music Video Generator offers a streamlined path. Upload your track, describe your visual concept, and the platform handles generation and sync. For musicians releasing frequently who need a music video maker ai free of complex editing workflows, this type of audio-first tool removes the biggest friction point: manually cutting dozens of clips to the beat in a timeline editor.
If you are comfortable in Premiere or DaVinci Resolve and want maximum visual fidelity per clip, Runway Gen-4 and Kling produce footage that looks genuinely cinematic. The tradeoff is real: a three-minute music video requires 20 to 30 separate generations, each manually timed to your track. That is a serious time investment, but the per-clip quality is currently unmatched.
Freebeat occupies a middle ground with strong audio analysis and character consistency across scenes. Its structural understanding of songs (detecting verses, choruses, and drops) means transitions land on actual musical moments rather than arbitrary intervals. For artists who need the best ai video generator for music videos with built-in Suno integration, it is a strong contender.
LTX Studio is worth considering if your concept is narrative-heavy and you plan to add music in post. Its storyboarding tools help you plan scene sequences visually before generation, which is useful for concept videos even though it has no audio awareness.
Free vs Paid Options Worth Considering
Budget matters, especially for independent creators testing the waters. Several platforms offer a music video ai generator free tier that lets you experiment before committing money. MakeBestMusic, One More Shot AI, and LTX Studio all provide free access with generation limits. These free tiers are genuinely useful for evaluating output quality and workflow fit before upgrading.
The limitations on free plans are predictable: lower resolution (typically 720p), watermarks on some platforms, shorter maximum duration, and fewer generation credits. For a single social clip or a test run, free tiers work fine. For a full-length release-quality video, paid plans unlock 1080p export, longer durations, and enough credits to iterate without running dry mid-project.
Tools like FlexClip ai music generator and Rotor Videos take a different approach, focusing more on template-based editing with stock footage than pure AI generation. These are worth considering if you want a quick lyric video or visualizer assembled from existing assets rather than fully generated scenes. They produce consistent, if somewhat generic, results with very little creative input required.
The ai music video generator free landscape changes quickly. New tools launch monthly, and existing platforms regularly expand their free tiers to attract users. What matters more than chasing the cheapest option is matching the tool to your actual need: do you want a complete video from a single upload, or raw AI footage you will assemble yourself? That answer determines which category of tool serves you, regardless of price.
With your platform selected, the next step is running the actual generation, where upload settings, resolution choices, and iteration strategy determine whether you get usable output on the first try or burn through credits learning what each tool actually needs.
Step 5 Generate and Sync Your AI Music Video
Your tool is selected, your prompts are written, and your audio file is ready. This is where the work becomes tangible. The generation step is where most creators either get usable output on the first attempt or waste credits clicking "generate" repeatedly without adjusting anything meaningful between runs. A deliberate approach to upload settings, configuration, and evaluation makes the difference.
Upload Your Track and Configure Settings
Every audio-aware generator follows a similar intake flow, though the specific interface varies. Whether you want to make an ai video from a song for free or you are on a paid plan, the configuration decisions remain the same. Here is the standard workflow most platforms follow:
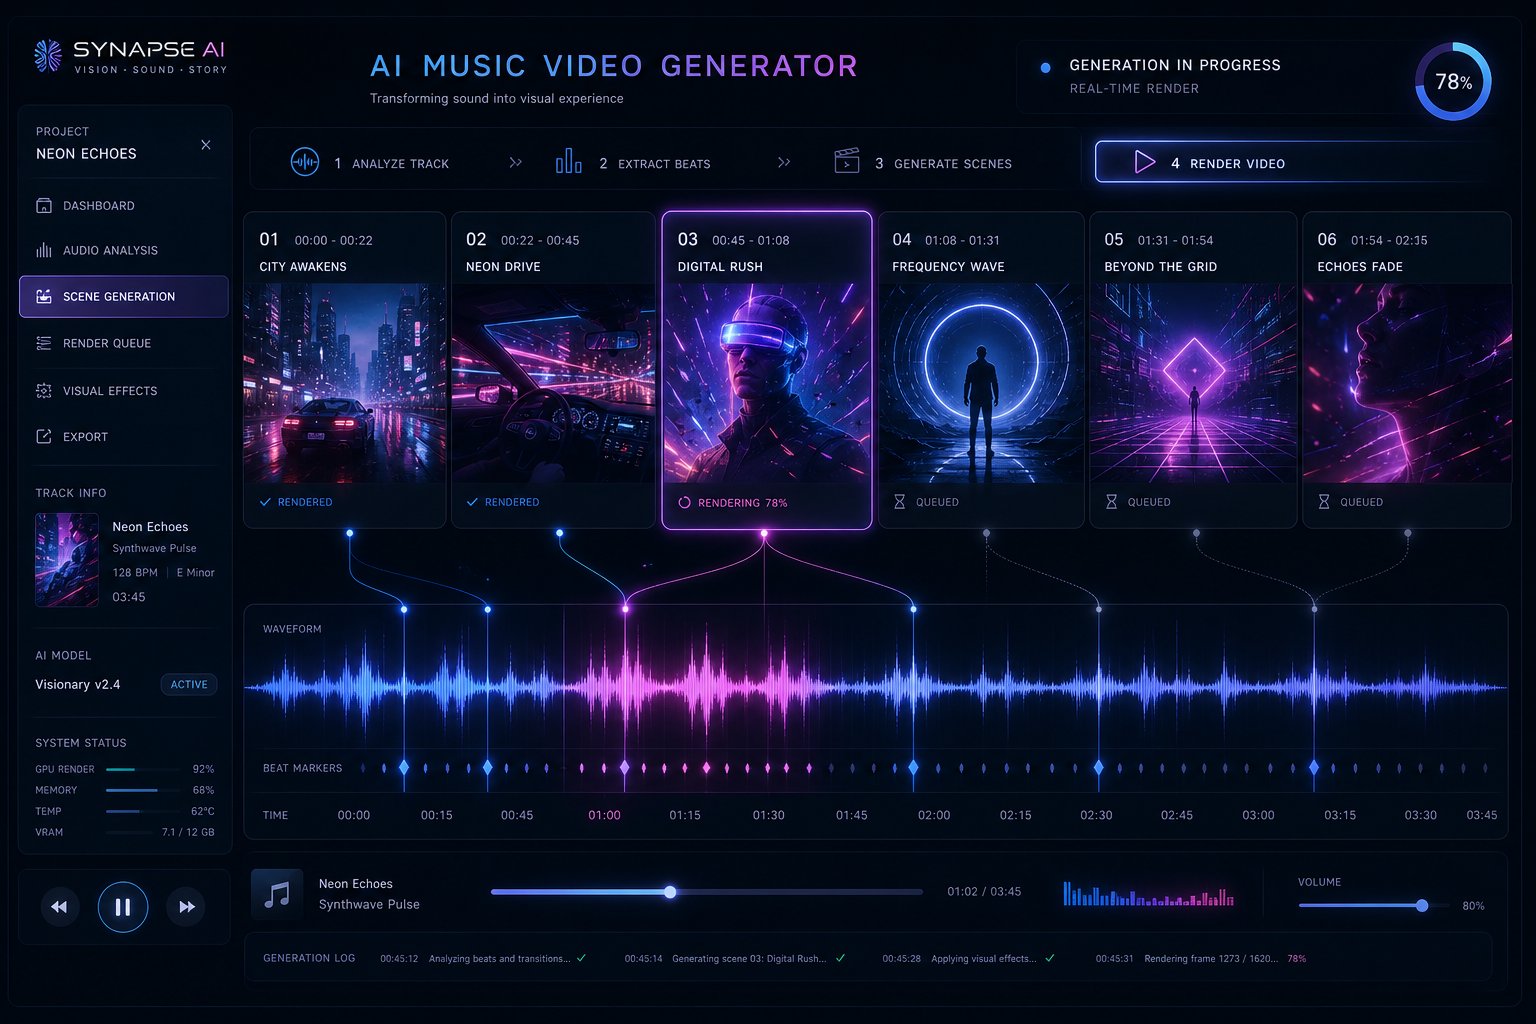
- Upload your audio file. Drag your MP3 or WAV into the platform's upload area. Tools like MakeBestMusic's AI Music Video Generator accept standard formats and begin analyzing your track's structure immediately, detecting beats, sections, and energy shifts that inform visual pacing.
- Enter your visual prompt or style description. Paste the prompts you crafted in Step 3. Some platforms accept a single global prompt that applies across the entire video, while others let you assign different prompts to different song sections (verse, chorus, bridge).
- Select your visual style preset. Most generators offer style categories: cinematic, anime, abstract, photorealistic, or illustrated. Choose the one closest to your reference material. This acts as a base modifier on top of your text prompt.
- Set resolution and aspect ratio. Pick 1080p at 16:9 for YouTube, or 1080p at 9:16 for TikTok and Reels. Changing this after generation means starting over, so commit now.
- Configure duration. Match it to your uploaded track length. If the platform caps output duration, select the strongest section of your song rather than the opening.
- Initiate generation. Hit generate and wait. Processing times range from two minutes for short clips to fifteen minutes or more for full-length videos, depending on resolution and platform load.
Generate Your First AI Music Video
Once generation starts, the platform processes your audio to identify tempo, section boundaries, and energy curves, then renders visuals that correspond to those musical landmarks. A free ai video generator from song will typically produce output at lower resolution or with a watermark, but the underlying sync logic works the same as paid tiers.
What determines output quality during this step? Three factors matter most. First, audio-visual sync accuracy: how tightly scene transitions align with beat changes and structural shifts in your song. Platforms that perform full BPM and section analysis (rather than just overlaying visuals on a timeline) produce noticeably better rhythmic alignment. Second, scene coherence: whether individual frames within a clip maintain consistent subjects, lighting, and environments rather than drifting mid-scene. Third, resolution fidelity: whether the output holds detail at full screen or softens into blur at the edges.
If you are using a free ai music video generator from mp3, expect your first result to be a starting point rather than a finished product. Even paid tools rarely produce a perfect video on the first generation. The real skill is knowing what to fix and how to fix it efficiently.
Evaluate and Iterate on Results
Watch your generated video all the way through with headphones on. You are evaluating three things simultaneously: does the visual energy match the musical energy at each moment? Are transitions landing on actual beats or falling between them? And does the visual style stay consistent from beginning to end?
When something is off, resist the urge to regenerate the entire video. Identify the specific problem:
- Sync drift - visuals feel disconnected from the beat. Try re-uploading your audio with silence trimmed from the start, or adjust section markers if the platform allows manual override.
- Style inconsistency - some scenes look like they belong to a different video. Refine your prompt to be more specific about color palette and lighting, keeping those elements identical across all sections.
- Low energy mismatch - a high-energy chorus gets calm, static visuals. Add motion and intensity keywords to your chorus-specific prompt: "fast cuts, dynamic camera movement, high contrast."
- Artifact-heavy frames - distorted faces, melting objects, or flickering elements. Simplify your subject description. Complex multi-character scenes push current models past their consistency limits.
Iterate one variable at a time. Change only the element that failed and regenerate that section. This surgical approach preserves what already works and avoids the frustration of losing a great verse clip because you re-rolled the entire video chasing a better chorus. A free ai music video generator from song gives you limited credits for iteration, so targeted fixes matter even more than on paid plans.
Most creators need two to four iterations to produce something they are genuinely satisfied with. That is normal. The goal is not perfection from the generator. It is getting output that is 80% there, because the remaining 20% is where post-production editing transforms raw AI output into a polished final product that does not look machine-made.
Step 6 Edit and Polish Your Final Video
Raw AI output rarely looks finished. Even when the generator nails the vibe and lands transitions on beat, you will notice inconsistencies: a scene that lingers two seconds too long, a visual flicker between clips, or lyrics missing entirely from what should be a lyric video. The editing phase is where you close the gap between "AI made this" and "this looks intentional." It is also what separates the creators getting real engagement from those uploading unedited generator output that viewers scroll past.
The good news? You do not need expensive software or years of editing experience. A free video and music app like CapCut or DaVinci Resolve gives you everything required to transform raw clips into a polished final product. The workflow scales to your skill level, from one-click templates for beginners to frame-level precision for experienced editors.
Import AI Output Into Your Editor
Most AI generators export as MP4 or MOV files. Download your generated video and bring it into a dedicated editing tool where you have full timeline control. Here are your main options:
- CapCut (Free) - Available on desktop, mobile, and web. Excellent for beginners with auto-captioning, built-in templates, and an intuitive drag-and-drop timeline. The best app to make a video with music if you want fast results without a learning curve.
- DaVinci Resolve (Free) - Professional-grade editing with advanced color grading, audio tools, and timeline precision. Ideal for creators who want maximum control over every frame.
- Adobe Premiere Pro (Paid) - Industry standard for multi-track editing, effects, and integration with the broader Adobe suite. Best for creators already embedded in that ecosystem.
- iMovie (Free, Mac only) - Simple and lightweight. Works well for basic trimming, transitions, and quick exports when you need something done fast.
- VN Video Editor (Free) - A capable mobile-first video with music app that handles basic editing, speed adjustments, and text overlays without a subscription.
Import your AI-generated video onto the main timeline. Then drag your original high-quality audio file onto a separate audio track beneath it. Mute the video file's embedded audio so your clean master takes priority. This ensures you are working with the best possible sound quality regardless of what the generator compressed during export.
Add Lyrics, Text Overlays, and Transitions
If you are building a lyric video, this step is where the text goes on. CapCut's auto-lyrics feature can transcribe your vocals and time-sync captions automatically, making it one of the fastest ways to make lyric videos free of manual timing work. Import an SRT subtitle file if you already have one from your lyrics sheet, or let the tool auto-generate captions and then correct any misheard words manually.
For creators looking for a free ai lyric video generator workflow, the combination of AI-generated visuals plus CapCut's auto-captioning delivers a complete free lyric video without any paid subscriptions. Style your text with templates to match the video's aesthetic: choose fonts, colors, and animation presets that complement rather than compete with the background visuals.
Transitions between scenes deserve attention too. AI generators sometimes produce abrupt cuts where a smooth crossfade would feel more musical. Add transitions at section boundaries: a gentle dissolve into a chorus, a blur transition during a bridge, or a hard cut on a beat drop. Time them to land precisely on musical moments by zooming into your timeline and snapping edits to waveform peaks.
Fine-Tune Audio-Visual Sync
Even with beat-aware generators, sync can drift by a few frames over a three-minute video. Play through the full timeline and watch for moments where visual transitions feel slightly early or late relative to the music. The fix is simple: select the video clip and nudge it forward or backward by one to three frames until transitions lock to the beat.
If you need to add audio to video AI free of sync issues, import your master audio file fresh and align it manually rather than relying on the generator's embedded audio. This gives you a clean reference track and eliminates any compression-related timing shifts introduced during generation.
A few quick polish moves that take minutes but dramatically improve perceived quality:
- Trim any AI-generated frames that flicker or distort, even removing a single bad frame cleans up the viewing experience.
- Slow down short clips slightly (to around 0.8x speed) to create a more cinematic feel and extend coverage over longer song sections.
- Add a simple fade-in at the start and fade-out at the end so the video does not begin or end abruptly.
- Layer a subtle film grain or color grade across the entire timeline to unify clips that have slightly different visual characteristics.
The editing phase does not need to take hours. Once you know the workflow, a full lyric video can come together in 20 to 30 minutes. For a more complex narrative video with scene reordering and custom transitions, expect closer to an hour. Either way, this is where your AI music video stops looking generated and starts looking directed, which sets you up for the final decisions around export settings and platform-specific formatting.
Step 7 Export and Publish Across Platforms
Your video is edited, synced, and looking polished. The temptation is to hit export and upload immediately, but the wrong export settings can undo hours of careful work. A 4K master rendered at the wrong aspect ratio gets cropped awkwardly on TikTok. A file exported at low bitrate looks soft and compressed on a large YouTube player. Getting this right takes two minutes of configuration and ensures your video looks as good on viewers' screens as it does on your timeline.
Export Settings for Each Platform
Every platform has its own sweet spot for resolution, aspect ratio, and file format. Uploading a one-size-fits-all export means at least one platform is displaying a compromised version of your work. Here is what each major destination expects:
| Platform | Aspect Ratio | Recommended Resolution | Max Length | File Format | Max File Size |
|---|---|---|---|---|---|
| YouTube | 16:9 | 1920x1080 (1080p) or 3840x2160 (4K) | 12 hours | MP4 (H.264) | 256 GB |
| TikTok | 9:16 | 1080x1920 | 10 minutes | MP4 or MOV | 4 GB (mobile), 10 GB (web) |
| Instagram Reels | 9:16 | 1080x1920 | 90 seconds | MP4 (H.264) | 4 GB |
| Instagram Feed | 1:1 or 4:5 | 1080x1080 or 1080x1350 | 60 seconds | MP4 (H.264) | 4 GB |
| YouTube Shorts | 9:16 | 1080x1920 | 60 seconds | MP4 (H.264) | 256 GB |
For bitrate, export at 10-16 Mbps for 1080p and 35-45 Mbps for 4K. Higher bitrate preserves detail in fast-moving AI-generated scenes where compression artifacts are most visible. Use H.264 codec for maximum compatibility, or H.265 if the platform supports it and you want smaller file sizes at equivalent quality.
If you planned your aspect ratio during generation (as recommended in Step 2), you already have the right framing. If you need to repurpose a 16:9 YouTube video for TikTok, crop to 9:16 in your editor rather than adding black bars. Center your crop on the most visually active area of each scene.
Publish to YouTube, TikTok, and Instagram
Figuring out how to make a music video on YouTube is straightforward from a technical standpoint: upload your MP4, fill in the metadata fields, and publish. The real question is how to make music videos for YouTube that actually get discovered among millions of uploads. The answer lives in how you package the video, not just the video itself.
For YouTube specifically, upload at the highest resolution you rendered. The platform re-encodes everything regardless, so giving it more data to work with results in a cleaner final stream. Set the video as a "Music Video" under the category dropdown. Add it to a playlist with your other releases. Enable embedding so blogs and social posts can reshare it.
For TikTok and Reels, shorter is better for initial traction. Pull the most visually striking 30 to 60 seconds from your full video rather than uploading the entire song. Use that clip to drive traffic to the full version on YouTube. Pin a comment with the YouTube link, or add it to your bio.
A practical approach for artists who want maximum coverage: export three versions from one edited timeline. A full-length 16:9 for YouTube, a 60-second 9:16 highlight for Reels and Shorts, and a 30-second 9:16 hook for TikTok. Same creative work, three pieces of content across four platforms.
Optimize Metadata for Music Video Discovery
Your video can look incredible and still get zero views if the metadata does not help people find it. How do i make a music video for youtube that actually reaches an audience? Discoverability comes down to three elements: title, description, and thumbnail.
For titles, lead with your artist name and song title, then add a descriptor. Something like "Artist Name - Song Title (Official Music Video)" or "Artist Name - Song Title [Visualizer]" follows the format viewers search for and algorithms recognize. Keep it under 60 characters so nothing gets truncated in search results.
Descriptions should include your song's lyrics (YouTube indexes this text for search), links to streaming platforms, and relevant hashtags. Mention the genre, mood, and any notable production details. The first two lines appear above the "show more" fold, so put your most important links and context there.
Thumbnails deserve real attention. A custom thumbnail with a single striking frame from your video, overlaid with readable text (song title or a lyric), outperforms auto-generated options consistently. Use high contrast and bold colors that stand out at small sizes. Faces, when relevant, attract more clicks than abstract imagery.
Tags still carry minor weight on YouTube. Include your artist name, song title, genre, and variations like "official music video" and "new music." On TikTok, hashtags do heavier lifting: combine trending music hashtags with niche ones relevant to your genre.
Publishing timing matters too. Release your music video within the first 24 hours of your song dropping on streaming platforms so the algorithm associates the video with the spike in search interest around your release. If you are building momentum for a track already live, post the video when your audience is most active, typically between 2-4 PM in your primary audience's time zone on weekdays.
With the right export settings and metadata in place, your AI music video reaches audiences in the format each platform rewards. The remaining challenge is knowing what to do when things go wrong during any point in this pipeline, because AI tools still have real limitations that every creator encounters eventually.
Troubleshooting Common AI Music Video Problems
Every creator making music video with ai hits the same walls eventually. The output flickers. The sync drifts. Characters morph between scenes. These are not signs you are doing something wrong. They are current limitations of the technology, and every tool on the market produces them under certain conditions. The difference between abandoning a project in frustration and finishing a polished video comes down to knowing which problems are fixable, which ones require workarounds, and which ones demand a fundamentally different approach.
Fix Flickering and Scene Inconsistency
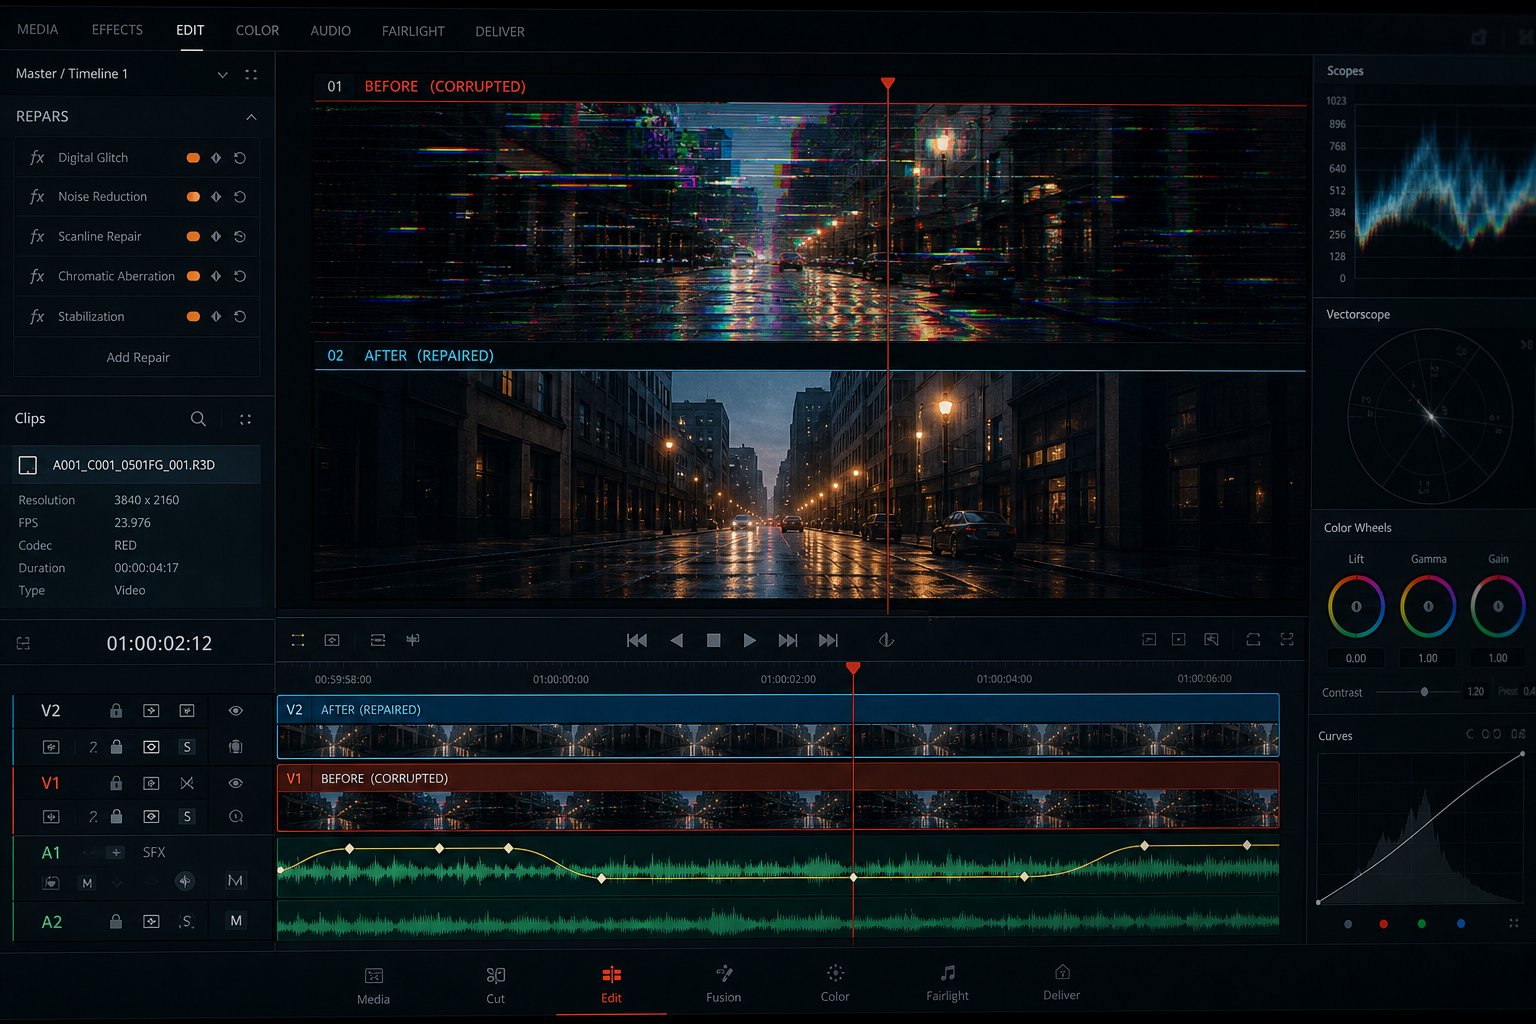
Flickering between frames is the most common visual artifact in AI-generated video. It shows up as subtle brightness pulsing, shifting textures on surfaces, or objects that appear slightly different from one frame to the next. The root cause is what researchers call temporal instability: the model generates each frame semi-independently and sometimes loses track of details established in previous frames.
According to Hedra's guide on AI video consistency, complex scenes with multiple subjects, long generation durations, and high motion all increase the likelihood of flickering. The more elements the model must track, the higher the chance something drifts.
Practical fixes that actually work:
- Generate shorter clips. A 3-second clip maintains internal consistency far better than a 10-second one. Cut your video into smaller segments and edit them together with intentional transitions. Cuts between clips naturally reset any drift that was building.
- Simplify your scene descriptions. A single subject against a clean background holds together more reliably than three characters in a detailed environment. If you need complexity, composite multiple simple generations in your editor.
- Use consistent anchor details in every prompt. Repeat specific visual elements (color palette, lighting direction, character clothing) across all prompts to give the model stable reference points. Ambiguous prompts invite frame-to-frame reinterpretation.
- Apply stabilization in post. DaVinci Resolve and Premiere Pro both offer frame-level stabilization that smooths subtle flickering. A light application reduces the "swimming" quality without making the footage look artificially frozen.
- Layer a film grain or texture overlay. A subtle grain applied uniformly across your timeline masks minor inconsistencies because the viewer's eye attributes small variations to the texture rather than to AI artifacts.
For style inconsistency across separate clips, where one scene looks like it belongs to a different video entirely, the fix happens at the prompt stage. Lock your lighting description, color palette, and style modifiers identically across every generation. "Warm golden hour light from the left, teal-orange color grade" should appear verbatim in each prompt, not paraphrased differently each time.
Solve Audio-Visual Sync Problems
Sync drift is the second most frustrating issue when you want an ai music video free of amateur tells. The visuals start aligned to the beat, then gradually fall behind or ahead over the course of a three-minute track. Sometimes transitions that should land on a drum hit arrive a beat early or late.
The causes are usually practical rather than mysterious:
- Silent padding at the start of your audio file. Even a half-second of silence before the first beat throws off alignment for the entire video. Trim your audio to start exactly at the first musical event before uploading.
- Frame rate mismatch. If your generator outputs at 24fps but your editor's timeline is set to 30fps, timing discrepancies accumulate. Percify's troubleshooting research confirms that frame rate mismatch between audio and video is a primary cause of synchronization failure. Always match your editor timeline frame rate to the generated video's native frame rate.
- Variable bitrate audio encoding. Some compressed audio formats use variable bitrate, which can introduce micro-timing differences. Export your audio as constant bitrate MP3 (320kbps CBR) or uncompressed WAV before uploading to any generator.
- Platform processing lag. Some generators add or remove frames during render, slightly shifting total duration. After downloading, check that your video's exact runtime matches your audio's runtime. If they differ even by a fraction of a second, manually stretch or trim the video layer in your editor to restore alignment.
The most reliable sync fix is manual: import your generated video into an editor, mute its embedded audio, drop your original master on a separate track, and nudge the video layer frame by frame until transitions lock to beat transients visible in the waveform. This takes five minutes and solves virtually every sync issue regardless of its cause.
Work Around Current AI Limitations
Some problems cannot be fixed. They can only be avoided. Being honest about what AI music video tools cannot yet do well prevents wasted time and unrealistic expectations. A 2026 analysis by is4.ai found that even leading models show noticeable quality degradation after 20 to 25 seconds of continuous generation, and complex human interactions remain firmly in uncanny valley territory.
Here is what still does not work reliably and what to do instead:
- Realistic human faces in close-up. AI-generated faces still morph subtly, especially during emotional expressions or when the camera is tight. Workaround: use medium or wide shots for human subjects, choose stylized or anime aesthetics that hide imperfections, or composite real performance footage with AI-generated backgrounds.
- Consistent characters across multiple clips. A character generated in scene one will look slightly different in scene five, even with identical prompts. Workaround: use reference images if the platform supports them, generate all clips for one character in a single batch, or embrace abstract and non-figurative visuals where character consistency is irrelevant.
- Readable text and legible details. Street signs, logos, and on-screen text render as garbled nonsense in most generators. Workaround: never ask the AI to generate text. Add all text, lyrics, and titles in your editor during post-production where you have pixel-perfect control.
- Realistic physics and fluid motion. Water, fabric, hair, and particle effects often look unconvincing. Workaround: avoid scenes that depend on accurate physics simulation. If you need flowing water or smoke, generate it as a separate short element and composite it over your main footage.
- Long-form narrative coherence. A three-minute story with consistent plot progression is beyond current single-generation capabilities. Workaround: plan your narrative as ten to fifteen independent shots, each described in its own prompt, then assemble the story through editing. This is how traditional filmmaking works anyway.
The creators producing ai music videos free of obvious AI tells are not using better tools than everyone else. They are choosing visual styles that play to AI strengths (abstract motion, stylized illustration, atmospheric landscapes) and handling everything that requires precision (text, sync, transitions, narrative structure) manually in post. That combination of AI generation for raw creative material plus human editing for intentional assembly is the workflow that produces results worth publishing.
If you are figuring out how to make an ai music video for free, these workarounds matter even more. Free tiers typically offer lower resolution and fewer iterations, so you need to get it right with fewer attempts. Plan simpler scenes, avoid photorealistic human subjects, and lean into the formats where current AI actually excels: abstract visualizers, anime-style sequences, and atmospheric landscape footage set to music. Work with the technology's strengths rather than fighting its weaknesses, and the gap between your free ai music video and a professionally produced one shrinks considerably.
