
What Stems Actually Mean in Music Production
Search for the word "stem" and you'll land on everything from verb stem definitions in linguistics to plant biology to STEM education acronyms. None of that is what producers, DJs, and engineers are talking about. In music production, the stem meaning is specific and practical, and understanding it unlocks a whole layer of creative control over your tracks.
What Does 'Stems' Mean in Music Production
Stems are grouped audio files that isolate key elements of a full mix, such as drums, bass, vocals, and instruments, exported so they play back in sync and recreate the original song when combined.
Think of a finished track as a complete meal. Stems let you separate that meal back into its core ingredients: the rhythm, the low end, the melody, the voice. Each file is a submix of related tracks bounced down to a single stereo audio file. A "drum stem," for instance, contains the kick, snare, hi-hats, and percussion all summed together rather than spread across a dozen individual channels.
The concept stems from a simple need: giving people downstream, whether that's a remixer, a mastering engineer, or a DJ, granular control over specific parts of a song without handing over the entire raw session. A stem synonym you might hear in casual conversation is "submix" or "grouped bounce," though "stems" remains the standard term across the industry. The definition of the stem in this context has nothing to do with linguistics or biology. It's purely an audio production workflow tool.
Why Stems Matter Across the Audio Industry
The reason stems show up everywhere, from bedroom studios to film scoring stages, is versatility. Remixers use them to rebuild a track from the ground up. Mastering engineers request them for finer tonal balance. DJs rely on them for live mashups and transitions. Content creators pull isolated vocals or instrumentals for video projects. Musicians use a seperator tool to strip out specific parts and practice along with what remains. Even details like BPM and key, the kind of info you'd grab from a BPM and key finder, become critical metadata when packaging stems for collaborators who need to match finder tempo and harmonic context quickly.
Whether you're exporting them from your DAW or extracting them from a finished mix, stems sit at the center of modern music collaboration. The sections ahead break down exactly how they differ from multitracks, how to group and export them correctly, and what to do with them once you have them.
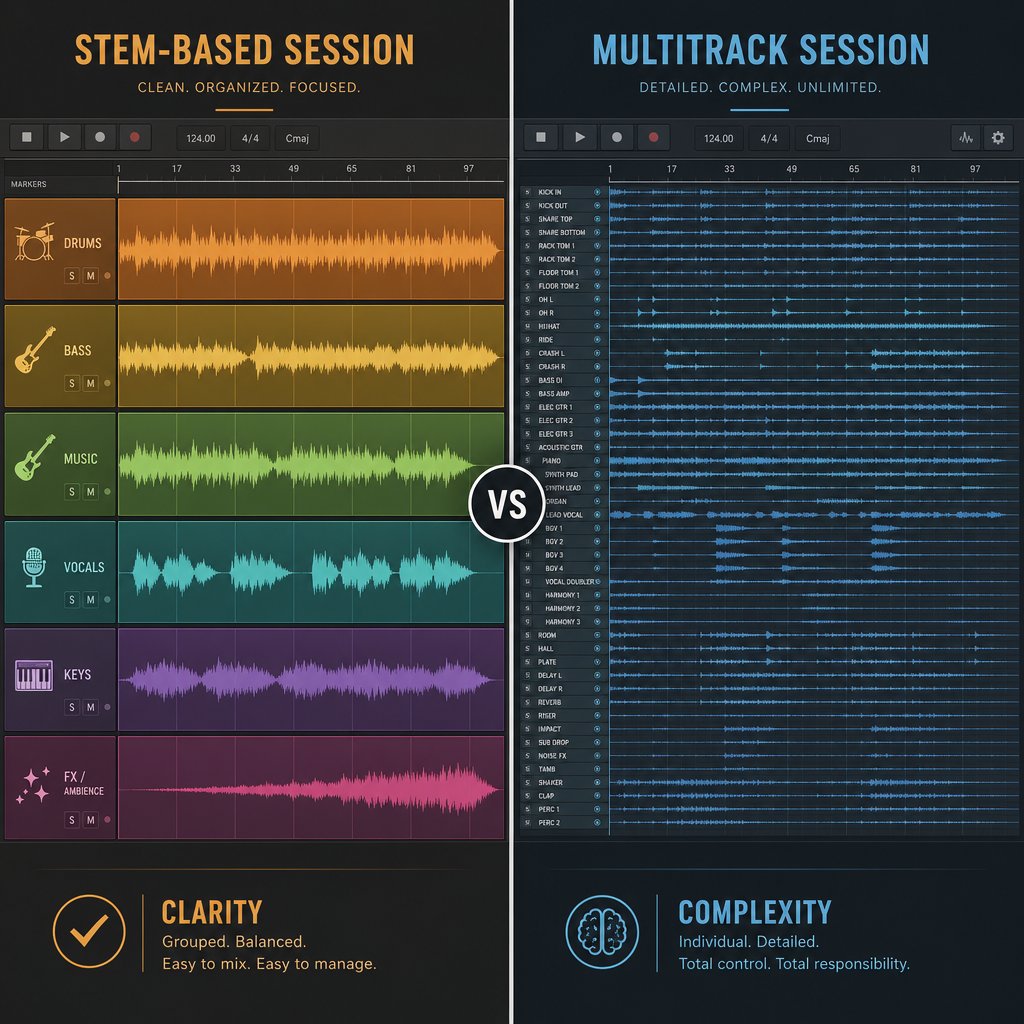
Stems vs Multitracks and Why the Difference Matters
Here's a scenario that plays out constantly: a producer tells a mastering engineer "I'll send you the stems," then uploads 47 individual raw tracks. Legendary mixer Bob Clearmountain has publicly called out this exact confusion, and it's more than a semantic issue. Sending the wrong format wastes time, costs money, and can derail a session before it starts. The distinction between stems and multitracks is one of the most misunderstood concepts in audio production, and getting it right changes how you collaborate.
Stems Are Grouped Submixes, Not Individual Tracks
Imagine you've recorded a drum kit with 12 microphones: kick in, kick out, snare top, snare bottom, three toms, hi-hat, two overheads, and two room mics. Each of those recordings is an individual track, a piece of the multitrack session. A drum stem, by contrast, takes all 12 of those tracks, processes and balances them, and bounces the result into a single stereo file. That one file is the drums, fully mixed and ready to sit alongside the bass stem, vocal stem, and instrument stem.
This grouping principle applies across the board. A vocal stem contains the lead and all backing vocals summed together with their effects. A guitar stem rolls every rhythm, lead, and acoustic guitar part into one file. The key idea is that each stem is a mini-mixdown, a processed submix, not a raw recording. As iZotope's Nick Messitte puts it, if you combine all your stems, they should add up to and sound exactly like the full mix.
Multitracks are the opposite end of the spectrum. They're the raw, unprocessed individual recordings you hand to a mix engineer so they have full creative control. Don't confuse this with a verb stem in language class, where you strip a word down to its root. In audio, you're not stripping anything. You're grouping processed elements together. The distinction matters because sending multitracks when someone asks for stems, or vice versa, fundamentally changes what the recipient can do with the files.
When to Use Stems vs Multitracks
The choice comes down to who's receiving the files and what they need to accomplish. A mastering engineer typically wants stems so they can make subtle balance adjustments, like pulling the bass down a couple of dB, without reopening the entire mix session. A remixer wants stems so they can keep the original vocal character while rebuilding the instrumental from scratch. Sync licensing for film and TV almost always requires stems so editors can duck vocals under dialogue or isolate the instrumental for a scene.
Multitracks, on the other hand, belong in the hands of a mix engineer who needs granular, track-level control. They're also essential during collaborative production when musicians in different studios need to overdub or rearrange individual parts. If you're working with a finished song and don't have the session files at all, an ai stem splitter free tool or audio extractor can isolate grouped elements from the mixed audio, though the result is closer to stems than true multitracks.
The table below breaks down the practical differences so you can make the right call for your next project. You'll also notice that details like tempo and key finder metadata become relevant when packaging either format for collaborators who need to match BPM and harmonic context.
| Dimension | Stems | Multitracks |
|---|---|---|
| Typical file count | 4-8 stereo files | 20-100+ mono/stereo files |
| Total file size | Moderate (hundreds of MB) | Large (often several GB) |
| Processing included | Yes, fully mixed with EQ, compression, and effects | No, raw and unprocessed |
| Flexibility for recipient | Balance and arrangement control between groups | Full control over every individual element |
| Common use cases | Mastering, remixing, sync licensing, live performance, archiving | Mixing, recording overdubs, arrangement editing |
| Who typically requests them | Mastering engineers, remixers, DJs, music supervisors | Mix engineers, producers, collaborating musicians |
| Summing expectation | All stems combined = the full mix | Requires a full mix to become a finished song |
Knowing which format to deliver saves you from awkward back-and-forth and keeps projects moving. But choosing the right format is only half the equation. How you actually group those instruments within your stems, which tracks go where and why, is a deliberate decision that shapes what the recipient can do with your music.
Standard Stem Groupings and How Instruments Are Organized
Grouping instruments into stems isn't random. Every decision about what goes where carries real consequences for whoever receives the files, whether that's a mastering engineer tweaking low-end balance or a film editor ducking music under dialogue. The categories you choose directly control how much flexibility the recipient has, so it pays to understand the logic behind the standard groupings before you bounce a single file.
The Five Core Stem Groups
Most professional sessions land on some variation of five foundational categories. These groupings stem from meaning that's been refined over decades of mixing, post-production, and collaborative workflows. Here's what they look like in practice:
- Drums and percussion: Every rhythmic element, from kick and snare to shakers, tambourines, and programmed percussion, gets summed into one file. This gives the recipient control over the entire rhythmic foundation as a single unit.
- Bass: Bass almost always gets its own dedicated stem, and the reason is physics. Low frequencies are the hardest to manage in mixing and mastering. Isolating the bass lets a mastering engineer adjust sub-level energy without touching anything else, or lets a remixer swap out the entire low-end character of a track. Whether it's a synth bass, upright, or electric, it belongs here.
- Vocals (lead and backing): So what is a vocal stem, exactly? It's the lead vocal, harmonies, ad-libs, and backing vocals all combined into one stereo file, complete with their processing and effects. Vocals carry the melody, lyrics, and emotional identity of a song, which is why they're separated. A sync editor might need to mute them under dialogue. A remixer might want to keep them intact while rebuilding everything else around them.
- Melodic instruments: Synths, keys, guitars, strings, and any other harmonic or melodic content that isn't bass. This is often the broadest group, acting as the harmonic and textural body of the track. Think of it as everything that fills the space between the rhythm section and the voice.
- Effects and atmospheres: Risers, pads, ambient textures, sound design hits, reverse effects, and anything that serves a transitional or atmospheric role. These elements might seem minor, but they're often what gives a track its sense of movement and space. Grouping them separately means an editor can strip them out for a cleaner sound or boost them for a more cinematic feel.
When all five groups play back together at equal volume, they should recreate the full mix exactly. That's the fundamental test, as Production Expert notes: stems are submixes that, combined, equal the original.
How Stem Groupings Change by Genre and Context
Those five categories are a starting point, not a rigid template. Genre and project context reshape the groupings constantly. In electronic music, you might split the melodic instruments stem fater into separate files for synth leads and atmospheric pads, because each serves a very different function in the arrangement. Hip-hop productions often pull ad-libs out of the main vocal stem and give them their own file, since a producer or DJ may want to drop them in and out independently. Orchestral scores, meanwhile, tend to group by instrument family: strings, brass, woodwinds, and percussion each get their own stem, giving the dub engineer surgical control during the final mix to picture.
The total number of stems typically ranges from four to eight, depending on the project's complexity and what the recipient actually needs. A simple singer-songwriter demo might only require four groups: vocals, guitar, bass, and percussion. A dense film score or layered electronic production could easily justify eight or more. The goal isn't to create as many as possible. It's to give the right amount of control without overwhelming the person on the other end.
Even tools like a free stem splitter or a chord identifier work within these same general categories, separating audio into vocals, drums, bass, and "other" because those divisions reflect how music is actually structured. Whether you're exporting from a DAW session or using a stem splitter powered by AI, the grouping logic stays the same.
Getting the categories right is a creative and technical decision that shapes every downstream workflow. But knowing what to group is only part of the process. The next question is how to actually export those groups cleanly from your session, with the right settings, so they arrive at their destination ready to use.
How to Create and Export Stems From Your DAW
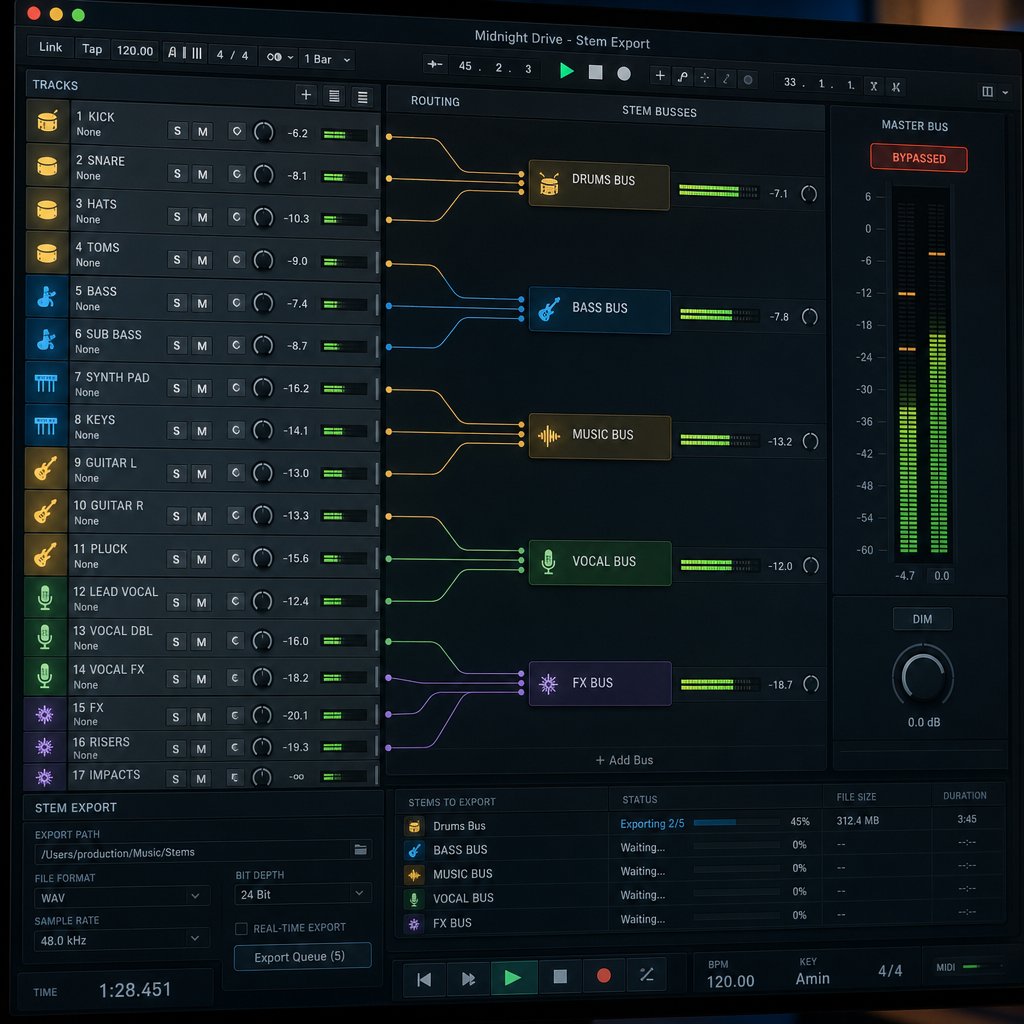
You've got your groups organized and your routing mapped out. The temptation is to hit "Export" and move on. But the difference between stems that work flawlessly on the other end and stems that cause hours of troubleshooting comes down to what you do in the five minutes before you bounce. Every major DAW, from Pro Tools to FL Studio, Ableton, Logic, and Reaper, follows the same core logic for stem export. The workflow details vary, but the preparation is universal.
Preparing Your Session for Stem Export
Before you render anything, run through a quick pre-export checklist. Skipping these steps is where most problems originate.
- Solo each stem group and listen back. Does the drum bus sound complete? Are all the backing vocals actually routed to the vocal group? You're checking for missing tracks and accidental omissions. If a synth pad got left out of every group, it simply vanishes from the final delivery.
- Decide what to do with your master bus processing. This is the single most common mistake producers make. If you have compression, EQ, or limiting on your master fader, that processing will get baked into every stem individually when you solo and export each group. When the recipient recombines them, those effects stack and the result sounds nothing like your original mix. The rule is simple: bypass your master bus chain before exporting, unless the recipient specifically asks for it.
- Check your send effects. Reverb and delay on aux sends need to be printed into the appropriate stem. If your vocal reverb lives on a separate return track, route that return into the vocal stem group. Otherwise, the vocals arrive dry and the reverb disappears entirely.
- Verify that every track belongs to exactly one group. A track routed to two stem buses means it gets exported twice, causing volume doubling or phase issues when the files are summed back together.
The actual export process varies by DAW. In Ableton Live, you solo each group and use File > Export Audio/Video. FL Studio lets you select "Split mixer tracks" during WAV export to render each mixer channel separately. Logic Pro's "Export All Tracks as Audio Files" handles it in one pass. Pro Tools offers a dedicated bounce-to-disk workflow where you can select multiple outputs. Reaper's render dialog includes a "Stems (selected tracks)" option directly. Regardless of the platform, the preparation steps above stay the same.
Bit Depth, Sample Rate, and Format Considerations
Technical settings matter more than most producers realize. Delivering stems in the wrong format is like writing a music note stem in the wrong clef: the information is there, but it's unusable in context.
The professional standard for stem delivery is 24-bit WAV at your session's native sample rate. If you recorded at 48kHz, export at 48kHz. If you tracked at 96kHz, keep it there. Converting sample rates during export introduces unnecessary artifacts. Let the recipient handle any conversion on their end if needed.
A few context-specific guidelines shape the decision further. For video and film work, 24-bit/48kHz is the industry norm because that's what post-production pipelines expect. For CD-quality or consumer-facing contexts, 16-bit/44.1kHz is acceptable. And for personal archives or collaboration where you want maximum flexibility, match the session's original settings exactly.
One format to avoid entirely for professional delivery: MP3 or any lossy codec. Lossy compression permanently removes audio data, and that loss compounds when the recipient processes or recombines the files. If someone needs to convert stems to a lighter format later, or even run an mp3 a midi conversion for transcription purposes, they can do that from a lossless source. You can't reverse the damage of delivering lossy files in the first place.
The table below maps out the recommended export settings for the most common delivery scenarios:
| Delivery Context | Bit Depth | Sample Rate | Format | Notes |
|---|---|---|---|---|
| Remix | 24-bit | Session native (44.1-96kHz) | WAV | Include BPM and key in filenames; bypass master bus |
| Mastering | 24-bit | Session native | WAV | Always include a stereo reference mix for comparison |
| Sync licensing (film/TV) | 24-bit | 48kHz | WAV or AIFF | 48kHz is the post-production standard; separate vocal and instrumental stems required |
| Personal archive | 24-bit | Session native | WAV | Match original session settings exactly for future flexibility |
| Casual collaboration | 16-bit or 24-bit | 44.1kHz | WAV | 16-bit acceptable if file size is a concern; avoid MP3 |
For producers wondering how to strip songs of vocals or isolate specific elements from a finished mix rather than a DAW session, the approach shifts entirely. An ai stem splitter uses machine learning to separate a mixed audio file into its component parts, functioning as an audio splitter that doesn't require access to the original project. That's a different workflow from manual DAW export, but the format and quality principles still apply: always work with lossless files as your source, and export at the highest quality the tool supports. Even the best audio stem seperator can only work with the quality you feed it.
Clean export settings and careful preparation are what separate stems that "just work" from stems that generate confused emails. But the files themselves are only half the delivery. How you name, organize, and package those files determines whether your collaborator opens the folder and gets straight to work, or spends twenty minutes trying to figure out which file is which.
File Naming and Delivery Best Practices for Stems
A perfectly exported set of stems loses half its value the moment a collaborator opens the folder and sees files named "Audio_03.wav" and "Bounce_Final_FINAL_v2.wav." As Audio Mixing Mastering puts it, sending files to an engineer should feel like handing over a well-packed toolkit, not a junk drawer. The naming and packaging layer is where many producers drop the ball, and it's entirely preventable.
File Naming Conventions That Prevent Confusion
A reliable naming structure answers one question instantly: what is this file? The format that works across every DAW, operating system, and upload portal looks like this:
[ProjectName]_[StemGroup]_[BPM]_[Key].[format]
So a drum stem might become SummerTrack_Drums_120BPM_Cmin.wav. Including BPM and key directly in the filename means the recipient doesn't need to load the file into a key bpm finder or tempo detector just to figure out basic session info. That small detail eliminates entire rounds of back-and-forth, especially in remote collaborations where you can't just lean over and ask.
- Avoid spaces in filenames. Use underscores or camelCase instead, since spaces can cause issues across platforms and upload portals.
- Skip special characters entirely: no parentheses, slashes, or asterisks.
- Include a version tag (v1, v2, RevA) every time you re-export. Without versioning, an outdated file can silently slip back into a session.
- Keep names descriptive but concise.
LeadVox_Dry_v2tells the whole story.Vocal_Recording_Session_Tuesday_Afternoon_Take3_NewCompdoes not. - Pick one convention and stick with it. If you choose "Vox," don't switch to "Vocals" halfway through. Consistency matters more than which abbreviation you prefer.
A useful gut check from the same guide: if someone downloads your folder a year from now, can they rebuild the session without asking you a single question?
Folder Structure and Delivery Packaging
Good filenames inside a messy folder still create friction. The folder structure itself needs to mirror how the recipient actually thinks about the project. A clean, professional delivery package looks like this:
SummerTrack_120BPM_Cmin/
Stems/
SummerTrack_Drums_120BPM_Cmin.wav
SummerTrack_Bass_120BPM_Cmin.wav
SummerTrack_Vocals_120BPM_Cmin.wav
SummerTrack_Melodic_120BPM_Cmin.wav
SummerTrack_FX_120BPM_Cmin.wav
Reference/
SummerTrack_FullMix_120BPM_Cmin.wav
SessionNotes.txt
The parent folder is named after the project. Inside, a Stems subfolder holds the grouped audio files. A Reference subfolder contains the full stereo mixdown, which is non-negotiable. That reference mix is how the recipient verifies that all the stems sum correctly and match what you intended. Without it, they're working blind.
The session notes file doesn't need to be elaborate. BPM, key, any processing notes ("master bus bypassed," "vocal reverb printed into vocal stem"), and contact info for questions. One page is enough. Think of it as the readme file for your music. Some producers also note whether files are suitable for direct use or if they'll need conversion, like running audio through a music converter to midi for transcription, or generating an mp3 midi file for notation work. That kind of context saves the recipient from guessing.
This packaging approach works whether you're sending files to a mastering engineer, a remixer, a sync licensing library, or a collaborator on the other side of the world. It's the difference between a midi cord of connection that keeps the project flowing and a tangled mess that stalls it. Consistent structure, clear names, and a reference mix: three habits that make every handoff seamless.
Packaging your stems professionally gets them out the door in great shape. The real question is what happens on the receiving end, where those files become the raw material for entirely new creative workflows.

How to Use Stems for Remixing, DJing, and Production
Having well-organized, cleanly exported files is only the starting line. The real creative payoff comes when those isolated elements land inside a new session and become raw material for something the original artist never imagined. Whether you're rebuilding a track from scratch, blending two songs live on stage, or practicing guitar along with a stripped-down arrangement, stems are the mechanism that makes it all possible.
Remixing and Sampling With Isolated Stems
A remix typically starts with one question: what do I keep, and what do I replace? Stems give you a clean answer. Import them into a fresh DAW session, and you've got the original song broken into manageable pieces, each sitting on its own channel, ready to be reshaped.
The vocal stem is usually the anchor. It carries the melody, the lyrics, the emotional identity of the track. Most remixers keep it intact, or close to it, while rebuilding everything underneath. You might time-stretch the vocal to fit a new tempo, pitch-shift it to match a different key, or chop it into rhythmic fragments for a completely different arrangement. A key finder music tool or your DAW's built-in detection helps confirm harmonic compatibility before you start layering new chords and bass lines around the original voice.
From there, the process is additive and subtractive at the same time. Maybe you ditch the original drum stem entirely and program a new rhythm from scratch. Maybe you keep the bass but run it through a distortion chain that transforms its character. Maybe you sample a two-bar loop from the melodic instruments stem and build a whole new section around it. The point is that each stem becomes an independent creative decision rather than an all-or-nothing commitment to the original mix. In the simplest sentence of stem usage: isolated parts give you permission to reimagine a song without losing what made it recognizable.
DJing, Live Performance, and Practice Workflows
If you've ever wondered what are stems in DJing, the answer is surprisingly hands-on. Instead of mixing two complete tracks together, a DJ working with stems can blend the vocal from one song over the instrumental of another, creating a live mashup that neither artist recorded. As StemSplit's DJ guide explains, techniques like acapella drops, bass swaps, and frequency crossfades all depend on having individual elements available on separate decks or faders. Modern DJ software from Rekordbox, Serato, and Traktor now includes native stem controls, though pre-separated files processed offline still deliver noticeably cleaner quality than real-time AI separation during a live set.
Beyond the club, stems open up practical everyday workflows. Musicians use them to isolate or remove specific instruments for practice: a drummer can mute the drum stem and play along with the rest of the band, while a guitarist can solo everything except the guitar part and fill in the gap. Content creators extract audio elements to build background music for videos, pulling an instrumental bed or an isolated vocal hook without licensing a separate track. Even karaoke setups rely on the same principle: remove the lead vocal, keep everything else.
The catch is that most of these scenarios involve finished songs where you don't have the original DAW session. You can't export stems from a project file that doesn't exist. This is where AI-powered separation tools come in. MakeBestMusic's Stem Splitter handles exactly this scenario, using AI to extract vocals, drums, bass, and other instruments directly from a mixed audio file in the browser. It's particularly useful for remixers working with reference tracks, DJs building a stem library before a gig, or anyone trying to figure out how to isolate vocals from a song without contacting the original producer.
Here's a quick reference for matching common use cases to the stem type you actually need:
- Karaoke or sing-along: remove the vocal stem, keep the full instrumental
- Remix production: isolate the vocal stem, rebuild the instrumental from scratch
- Guitar or bass practice: extract audio for drums and vocals only, play your instrument over the top
- DJ mashups and transitions: use the vocal stem of one track over the instrumental of another
- Content creation (video/podcast): pull the instrumental or ambient stem for background music
- Song analysis or transcription: isolate individual elements to study arrangement, or convert parts from midi a mp3 for notation reference
- Sampling: grab a specific drum loop, bass riff, or melodic phrase from its isolated stem
Each of these workflows starts with the same foundation: getting clean, separated audio from a full mix. Whether you export from your own session or use a song finder by audio tool paired with AI separation, the creative possibilities scale with the quality of your source material.
Of course, not every stem export or extraction goes smoothly. Phase issues, missing elements, and files that refuse to sum back to the original mix are frustrations that nearly every producer encounters, and most guides never bother to address them.
Common Stem Mistakes and How to Troubleshoot Them
You've exported everything, zipped the folder, and sent it off. Then the email comes back: "These don't match the mix." It's one of the most common and most frustrating problems in stem delivery, and the causes are almost always preventable. Whether the issue originates from your DAW session or from files you pulled using a stem splitter free tool, the troubleshooting logic is the same.
Why Your Stems Don't Sum to the Original Mix
This is the number one complaint mastering engineers raise, and the root cause is almost always master bus processing. If you have a compressor, limiter, or EQ sitting on your master fader while you solo and export each group individually, that processing reacts differently to each isolated group than it did to the full mix. A limiter that was gently catching peaks on a dense arrangement will clamp down aggressively on a solo vocal bus. When the recipient recombines everything, the dynamics and levels are completely wrong.
The fix is straightforward: bypass your entire master bus chain before exporting. Sage Audio recommends an alternative for engineers who rely heavily on mix bus compression: use a sidechain to key the compressor's input to the full mix while rendering each individual group. That way the compressor reacts as it did during the original mixdown, and the exported files sum correctly.
Two other culprits stem from overlooked routing. First, missing tracks: if an instrument isn't assigned to any group bus, it simply disappears from the delivery. Second, unprinted send effects. Your vocal reverb living on a separate aux return won't appear in the vocal file unless that return is explicitly routed into the vocal group. As Master Your Track's checklist notes, muting unwanted tracks rather than soloing wanted ones helps catch solo-safe issues on effects returns that would otherwise bleed across groups.
Phase Issues and Overlapping Stem Groups
Imagine you route a rhythm guitar to both the melodic instruments bus and the effects bus. When the recipient plays both files simultaneously, that guitar signal doubles in volume. Flip the polarity on one, and you get phase cancellation instead, where overlapping peaks and troughs weaken or eliminate certain frequencies entirely. The result is a thin, hollow sound that no amount of EQ can fix.
The rule is simple: every track in your session should belong to exactly one stem group. No exceptions. If a track serves double duty, like a pad that's both melodic and atmospheric, make a creative decision about where it fits best and commit. Duplicating it across groups might seem harmless, but it breaks the fundamental promise that all files should sum to equal the original mix. This same principle applies when using a drum remover or any AI-based separation tool. If the algorithm assigns energy from the same frequency range to two output files, you'll hear artifacts when those outputs play together.
Format and Compatibility Problems
Even when the routing is perfect, technical mismatches can derail a session on the receiving end. The most common offenders:
- Mismatched sample rates: if one file exports at 44.1kHz and another at 48kHz, they'll drift out of sync over time. Always export every file at the same native session rate.
- Different start points: stems must all begin from the same timeline position, typically bar one or the very start of the session. If the vocal file starts at bar 9 because that's where the singer comes in, it won't align with the drums that start at bar 1. Consolidate from the same start point so every file is the same length, even if that means long stretches of silence.
- Lossy format degradation: delivering in MP3 or AAC permanently removes audio data. That loss becomes audible when the recipient processes or layers the files. Stick with WAV or AIFF. If someone downstream needs to run a wav to midi conversion or any other transformation, they can do that from a lossless source without compounding quality loss.
Before you dividi rip your project into separate files and send them off, run through this pre-delivery checklist:
- All files start at the exact same timeline position
- All files are the exact same length
- All files share the same sample rate and bit depth
- Stems summed at unity gain match the reference mix
- File names are clear, consistent, and include BPM and key
- A stereo reference mix is included in the delivery folder
- Master bus processing is bypassed (or sidechain-keyed to the full mix)
- Every session track is routed to exactly one stem group
Import your exported files into a blank session and play them back together before sending anything. If the sum doesn't sound identical to your original mix, something got missed in the routing or processing chain. Five minutes of verification here saves days of revision later.
Troubleshooting fixes problems after they happen. But the landscape of tools available for creating and extracting stems in the first place keeps evolving, especially on the AI side, where the quality gap between session exports and machine-separated files is narrowing fast.
Tools and Software for Splitting Stems From Any Song
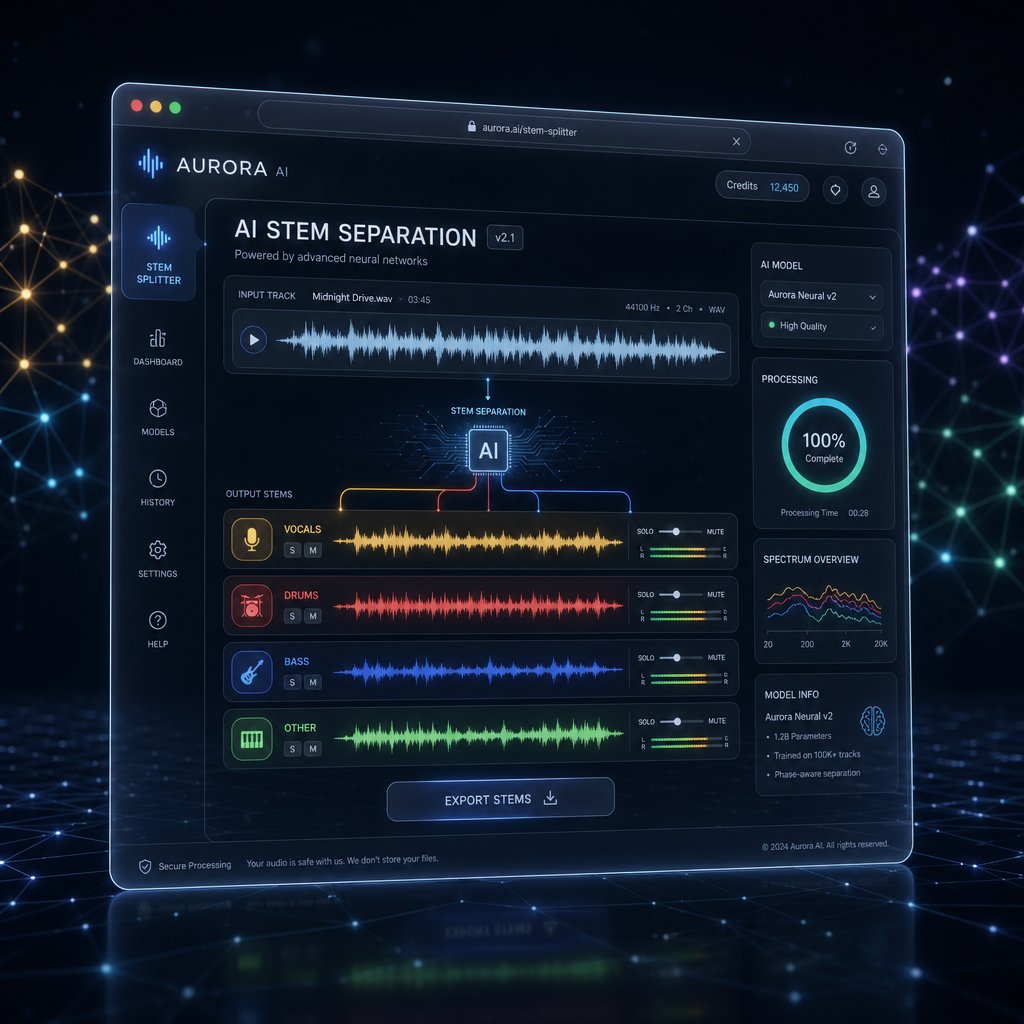
The quality gap between manually exported files and AI-extracted ones has shrunk dramatically. A few years ago, machine-separated audio sounded hollow and riddled with artifacts. Today, the best tools produce results clean enough for professional remixes, DJ sets, and sync placements. So what is stem separation in practical terms? It's the process of using trained AI models to deconstruct a finished stereo mix into its individual components, no original session files required. Whether you need a vocal isolation, a drum loop, or a clean instrumental, the right stem separator can pull it from almost any track in your library.
AI-Powered Stem Separation Tools
Modern AI stem splitters rely on deep learning architectures, most notably Meta's Demucs and Open-Unmix, trained on massive datasets of isolated instrument recordings paired with their corresponding mixes. The model learns to recognize the spectral fingerprint of a vocal, a kick drum, a bass guitar, and then applies that knowledge to new audio it has never heard before. The result is a set of separated files, typically vocals, drums, bass, and everything else, that you can immediately drop into a DAW or DJ software.
Not every tool delivers the same quality, though. When evaluating your options, focus on these criteria:
- Supported output stems: Does it only split into four groups, or can it isolate guitar, piano, and other specific instruments?
- Audio quality and artifact levels: Listen for warbling, metallic whistles, or phasing, especially on vocals and cymbals.
- Processing speed: Some tools take seconds, others take minutes per track. Cloud-based services may queue during peak hours.
- Supported input formats: Can it handle WAV, FLAC, and MP3, or only certain file types?
- Cost structure: Free tiers, per-minute credits, subscriptions, or one-time purchases all exist in this space.
MakeBestMusic's Stem Splitter checks these boxes with a browser-based workflow that requires no software installation. Upload a track, and the AI separates it into vocals, drums, bass, and other instruments directly in your browser. For producers building a remix from a reference track, DJs prepping a stem library before a gig, or content creators who need a clean instrumental, it's a fast and accessible entry point. The browser-native approach also means you can process files from any device without worrying about OS compatibility or GPU requirements.
For those who want to explore further, the broader landscape offers a range of options. MusicTech's 2025 roundup highlights tools like Gaudio Studio and Lalal.ai for high-quality vocal extraction, while MusicRadar's comparative testing found Apple Logic Pro 11.2 leading the pack among DAW-integrated options, with Steinberg SpectraLayers Pro close behind for spectral editing workflows. Free tools like Ultimate Vocal Remover offer surprisingly capable separation if you're willing to navigate a less polished interface and experiment with different AI models. Some of these platforms also double as a beat key finder or mp3 key finder, detecting tempo and harmonic info alongside the separation itself.
Choosing the Right Approach for Your Workflow
The decision tree is straightforward. If you have the original DAW session, export your stems manually. You'll get the highest possible quality because you're working with the actual source tracks, fully processed and routed exactly as you mixed them. Every technique covered in the earlier sections of this article applies here: bypass the master bus, print your sends, verify the sum.
If you only have a finished mix, an MP3 from a streaming rip, a WAV from a collaborator, or a track you want to remix but never produced, AI separation is your path. The quality won't match a manual export from the original session, but for most creative applications, from DJ transitions to practice tracks to sampling, it's more than sufficient. You can even convert mp3 to midi afterward using a dedicated midi converter if you need notation or want to reprogram a part with a different instrument.
| Dimension | Manual DAW Export | AI Stem Separation |
|---|---|---|
| Audio quality | Lossless, identical to the original mix | Near-lossless; minor artifacts possible on complex material |
| Flexibility | Full control over groupings, routing, and processing | Limited to the tool's predefined output categories |
| Speed | Moderate (requires session prep and rendering) | Fast (seconds to minutes per track) |
| Requirements | Original DAW project file and session access | Only the finished audio file (WAV, MP3, FLAC, etc.) |
| Best for | Mastering, sync licensing, professional remix commissions | DJ prep, sampling, practice, content creation, casual remixing |
The interest in AI-powered separation has stemmed from meaning that's deeply practical: most of the music you want to work with exists only as a finished file. You don't have the session. You don't know the producer. You just have the track. These tools bridge that gap, turning any song into workable raw material.
Whether you're exporting from a carefully routed session or feeding a mixed track into an AI separator, the underlying principle hasn't changed since the first engineer bounced a submix to tape. Stems give you control over the pieces of a song without forcing you to rebuild the whole thing. They're the connective tissue between creation and collaboration, between a finished mix and a fresh idea. The tools keep getting better. The creative possibilities keep expanding. And the only real limit is what you decide to do with the parts once you have them.