
What AI Music Covers Are and How the Technology Works
Imagine hearing Frank Sinatra sing a modern pop hit or SpongeBob belt out a power ballad. That's the world of AI music covers, and it's not science fiction. These are real audio outputs generated by neural networks that have learned to replicate specific voices with startling accuracy.
What Is an AI Music Cover
An AI cover is a song where the original vocalist's voice has been replaced by an AI-generated replica of someone else's voice. Unlike a human cover artist who reinterprets a song, an AI cover preserves the exact melody, timing, and phrasing of the original performance while swapping the vocal identity entirely. The instrumental stays untouched. Only the voice changes. The result can sound so convincing that listeners struggle to tell it apart from a genuine recording by the target artist.
How Voice Conversion Technology Works Under the Hood
The pipeline behind AI music covers follows a clear sequence: source audio goes in, vocals get extracted from the instrumental, a trained voice model transforms those vocals, and a finished track comes out. The most widely used framework powering this process is RVC (Retrieval-based Voice Conversion), which treats voice conversion as a disentanglement task, separating what is being said (or sung) from who is saying it.
RVC uses a content feature extractor based on HuBERT to capture speaker-invariant information like phonemes and intonation. A pitch extractor called RMVPE handles fundamental frequency estimation, which is critical for singing. Then a conditional acoustic model built on VITS reconstructs the audio in the target voice. A retrieval module adds the final layer of realism by pulling stored vocal features from the target speaker's training data during generation, reducing any "timbre leak" from the source singer.
Voice conversion is fundamentally different from text-to-speech. TTS generates speech from written words using pre-built voice profiles. Voice conversion takes an existing vocal performance and re-skins it with a different identity, preserving the original emotion, breath, and musical expression that no typed script could capture.
Why AI Covers Have Exploded in Popularity
AI song covers went from niche experiment to internet phenomenon for a few reasons. RVC's open-source release gave anyone with a computer access to studio-grade voice conversion. The results were immediately shareable, funny, and sometimes eerily beautiful. Viral moments like the Fake Drake track and AI Stefanie Sun covers proved the technology could fool real listeners. Platforms like TikTok and YouTube became flooded with AI covers ranging from celebrity mashups to anime character renditions, turning ai music covers into one of the fastest-growing creative trends online. The barrier to entry dropped to nearly zero, and the creative possibilities felt limitless.
But getting results that actually fool diehard fans requires more than clicking a button. It starts with choosing the right source material.
Step 1: Pick Your Source Song and Prepare the Audio
Your choice of source song determines roughly half the quality of your final AI cover. Feed the model a pristine vocal recording, and the conversion engine has rich, clean data to work with. Feed it a muddy live bootleg, and no amount of post-processing will rescue the output. If you want to make AI cover songs that genuinely impress listeners, song selection and audio preparation deserve serious attention before you touch any AI tool.
How to Pick a Song That Converts Well
Not every track is a good candidate. Songs with heavy vocal effects like auto-tune, distortion, or layered harmonies introduce complexity that confuses most voice conversion models. Duets and tracks where background vocals bleed into the lead are equally problematic, because the AI tries to convert every voice it detects, often producing garbled artifacts in the process. Altered AI's source file guidelines emphasize that recordings with strictly one speaker (or singer) at a time produce the best conversions.
The ideal cover for a song starts with a track where the lead vocal sits clearly in front of the mix. Think studio-quality pop, R&B, or acoustic recordings where the singer's voice is prominent, dry, and relatively unprocessed. Ballads and mid-tempo songs tend to convert more cleanly than rapid-fire rap verses, simply because the model has more time per syllable to reconstruct the target voice accurately.
Audio Quality Requirements and Format Specs
File format matters more than most beginners realize. When you upload a song for AI voice conversion, the quality of that input file sets a hard ceiling on your output. Here's what to aim for:
- High bitrate: Use WAV (uncompressed) or FLAC (lossless compressed) files whenever possible. If you only have MP3, make sure it's at least 320 kbps. Lower bitrates strip away high-frequency vocal detail the model needs.
- Minimal background noise: Studio recordings with controlled environments outperform live performances, phone recordings, or tracks ripped from low-quality YouTube streams. Background hum, reverb, and crowd noise all degrade conversion accuracy.
- Clear vocal presence: The lead vocal should be the dominant element. Songs where vocals are buried under dense instrumentation make stem separation harder and leave artifacts in the isolated vocal track.
- Appropriate key range: Choose a song whose vocal range sits comfortably within the target voice model's trained range. Extreme highs or lows outside the model's sweet spot produce strained, unnatural output.
Professional producers working on how to make AI song covers often start with official studio stems when available. If you only have a full mix, that's fine, but recognize that every layer of processing between the original recording and your input file chips away at potential quality.
Matching Songs to Voice Models for Natural Results
This is the step most people skip, and it's exactly where amateur-sounding AI covers fall apart. A deep baritone voice model applied to a soprano pop track will sound forced no matter how good the technology is. Before you commit to a song, think about three dimensions of compatibility.
First, vocal range. If the original song sits in a tenor range and your target voice model was trained on a tenor singer, you'll need minimal pitch shifting, which preserves quality. Large pitch shifts (beyond five or six semitones) introduce noticeable warping. Second, tempo and phrasing style. A voice model trained on smooth R&B vocals will struggle with staccato punk rock delivery. The rhythmic DNA of the source song should feel natural for the voice you're applying. Third, tonal character. Breathy voices pair well with intimate acoustic tracks. Powerful, belted voices suit anthemic choruses. Matching the emotional weight of the song to the vocal personality of the model is what separates a novelty clip from a genuinely convincing cover.
Most AI cover platforms let you song upload a track and preview short clips before committing to a full conversion. Use that preview feature aggressively. Understanding how to upload a song is simple, but knowing which song to upload is the real skill. Test two or three candidates with the same voice model and compare results before investing time in post-production.
With the right source track selected and properly formatted, the next challenge is surgically separating the vocal from everything else in the mix.
Step 2: Separate Vocals from the Instrumental
Voice conversion models expect a clean, isolated vocal track as input. Feed them a full mix with drums, bass, and guitars still attached, and the AI will try to convert everything it hears, producing garbled, artifact-laden output that sounds nothing like a real performance. Stem separation is the bridge between your source song and a usable vocal file, and the quality of this step directly determines how natural your ai cover song will sound.
Why Vocal Isolation Is Critical for Quality
Think of it this way: a voice conversion model is trained to understand human vocal characteristics like timbre, formants, and pitch contour. When instrumental bleed leaks into the vocal stem, the model interprets those frequencies as part of the voice and attempts to transform them. The result is warbling artifacts, metallic distortion, and phantom sounds that immediately mark the output as AI-generated. Clean separation gives the model exactly what it needs and nothing more.
This step also produces the instrumental track you'll need later. Once the AI generates your converted vocal, you'll mix it back over that same instrumental to create the final cover. If the separation is sloppy, you'll hear phasing issues and frequency gaps in the backing track too. A good split benefits both halves of the equation.
Free Stem Separation Tools You Can Use Today
You don't need expensive software to get quality results. Several free and affordable tools handle vocal extraction well enough for ai cover songs that sound polished and professional.
Ultimate Vocal Remover (UVR) is a free, open-source application available for Windows, macOS, and Linux. It offers multiple processing models, including MDX-Net mode, which MusicRadar's testing found delivers exceptional and entirely lossless vocal extraction quality. UVR also supports GPU acceleration for faster processing if you have an Nvidia card. The trade-off is that its interface can feel technical, and macOS installation requires workarounds due to Apple's security requirements.
Demucs, developed by Meta Research, is another free option that separates audio into vocals, drums, bass, and other stems. It runs locally on your machine and produces solid results, though its default four-stem separation means everything that isn't vocals, drums, or bass gets lumped into a single "other" category. For AI cover purposes, you primarily need the vocal stem, so this limitation rarely matters.
Browser-based options like LALAL.AI and Moises.ai offer stem separation without any software installation. LALAL.AI recognizes up to ten different instrument types and delivers consistently good extraction quality, though its credit-based pricing means costs add up if you're processing many tracks. Moises.ai provides a broader toolkit for musicians but is slightly weaker on vocal extraction compared to dedicated tools. Both are ideal if you want quick results without configuring local software.
For those creating instrumental covers of pop songs as a starting point, these same tools give you a clean backing track to work with, whether you're applying an AI voice or simply need a karaoke-style instrumental.
Tips for Getting the Cleanest Vocal Stems
The tool you choose matters, but how you use it matters just as much. Follow this workflow for the best results:
- Start with the highest quality source file. Use WAV or FLAC rather than compressed MP3. Stem separators work with frequency data, and lossy compression removes exactly the subtle details they need.
- Select the highest processing depth available. Tools like UVR and SpectraLayers offer quality settings that trade speed for accuracy. Always choose the slowest, most thorough option when quality is the priority.
- Use MDX-Net mode in UVR for vocal-only extraction. If you only need the vocal stem (which is the case for most AI covers), MDX-Net outperforms Demucs mode in UVR and produces cleaner, more lossless results.
- Listen critically before proceeding. Solo the extracted vocal and check for instrumental bleed, especially in the low end (bass leakage) and high end (cymbal splash). If you hear obvious artifacts, try a different model or tool before moving forward.
- Run a second pass if needed. Some producers extract vocals with one tool, then run the result through a second separator to catch residual bleed. This aggressive approach works well for dense mixes where a single pass leaves traces of instrumentation behind.
Worth noting: some all-in-one AI cover platforms handle stem separation automatically as part of their pipeline. If you're a beginner who wants a streamlined experience without juggling multiple tools, these integrated platforms let you skip this manual step entirely and jump straight to voice model selection. The trade-off is less control over separation quality, but for most casual ai song cover projects, the built-in processing is more than adequate.
With a clean vocal stem in hand, the next decision shapes the entire character of your cover: which voice will sing it.
Step 3: Find and Select Your AI Voice Model
The voice model you choose defines the entire identity of your AI cover. A well-trained model on clean audio sounds convincing and natural. A poorly trained one sounds robotic, muddy, or generic regardless of how perfect your source vocal is. Thousands of community-made models exist online, covering everything from celebrity voice AI replicas to fictional characters and custom clones. The challenge isn't finding a model. It's finding a good one.
Where to Find Pre-Trained Voice Models
The RVC community has produced an enormous library of freely available voice models. Quality varies wildly between uploads, so knowing where to look saves hours of frustration. Here are the most reliable sources:
Weights.gg is the largest dedicated RVC voice model repository. It features community ratings, audio previews, download counts, and metadata like model version, training epochs, and sample rate. If you're searching for a weights ai cover model of a specific artist or character, start here for the widest selection and most transparent quality indicators.
Hugging Face hosts many high-quality models from serious creators who document their training parameters, dataset sources, and intended use cases. Search for "RVC model" or "RVC v2" to find them. Models here tend to be better documented than those on other platforms.
AI Hub Discord is the largest RVC community server, with active model-sharing channels and a dedicated #voice-models forum where creators upload their work with Hugging Face download links. You can listen to audio samples directly in the posts, and if you can't find what you need, a #request-models channel lets you ask the community to build one for free.
If none of these sources have the voice you want, you can train your own model from scratch using 10 to 30 minutes of clean, isolated vocal audio and a GPU with at least 6 GB VRAM. Tools like Applio handle the training process, though the learning curve is steeper than simply downloading a pre-made model.
Celebrity and Character Voice Models Explained
Voice models fall into distinct categories, each with different use cases and quality expectations. A cloned celebrity voice trained on hours of studio-quality recordings will generally outperform a cartoon character model built from compressed TV audio. Understanding these categories helps you set realistic expectations for your output.
| Category | Example Use Cases | Typical Quality | Where to Find |
|---|---|---|---|
| Celebrity | Drake singing country, Adele covering metal, Frank Sinatra on modern pop | High (abundant clean training data available) | Weights.gg, Hugging Face, AI Hub Discord |
| Anime | Hatsune Miku voice generator covers, anime character song renditions | Medium to High (depends on source audio quality) | Weights.gg, dedicated anime model communities |
| Cartoon | SpongeBob AI voice covers, Peter Griffin AI voice singing ballads, Sonic AI voice mashups | Medium (TV audio compression limits training data quality) | Weights.gg, AI Hub Discord, Reddit r/RVC |
| Custom | Your own voice, a friend's voice, original characters | Variable (depends entirely on your training data and process) | Self-trained using Applio or similar tools |
Celebrity voice AI models tend to produce the most convincing results because famous singers have extensive catalogs of professionally recorded, well-isolated vocal material available for training. Cartoon and anime models can be hit-or-miss. A spongebob ai voice model trained on remastered Blu-ray audio will outperform one scraped from low-bitrate YouTube clips. The peter griffin ai voice category is popular for comedy covers, though the exaggerated vocal style means these models work best for humorous content rather than serious musical applications.
How to Evaluate Model Quality Before Using It
Downloading every model that catches your eye wastes time. A few quick checks help you filter out low-quality uploads before you commit:
- Check training data duration. Models trained on 15 to 40 minutes of clean audio generally sound best. Under 5 minutes of training data produces thin, generic output.
- Look for v2 models. RVC v2 uses 768-dimensional feature vectors compared to v1's 256 dimensions, capturing significantly more vocal detail. Always prefer v2 when available.
- Confirm an .index file is included. The .index file contains a searchable database of real acoustic patterns from the target voice. Models distributed without one sound noticeably more generic and less faithful to the original speaker.
- Read the description. Trustworthy uploads document training parameters like epoch count, f0 extraction method (RMVPE is current best), and sample rate. A model described as "trained on 25 min clean vocal, 300 epochs, RMVPE, 40kHz" tells you the creator knew what they were doing.
- Listen to demos. Platforms like Weights.gg often include audio previews. Five seconds of listening tells you more than any written description about whether a model captures the target voice convincingly.
- Check community response. Download counts, ratings, and comments indicate whether other users got good results. High engagement usually correlates with higher quality.
A voice model is only as good as the data it was trained on and the care taken during training. Spending an extra five minutes evaluating before downloading saves you from running conversions that produce disappointing results and sending you back to square one.
With a quality voice model selected, the next question becomes which tool you'll use to actually run the conversion and hear your cover come to life.

Step 4: Choose Your AI Cover Generation Tool
You've got a clean vocal stem and a quality voice model ready to go. The tool you use to bring them together shapes everything from output quality to how much of your afternoon disappears into troubleshooting. AI cover generators fall into two broad camps: browser-based platforms that handle the heavy lifting on remote servers, and local software you install and run on your own machine. Each approach carries real trade-offs, and the right choice depends entirely on your technical comfort level and goals.
Browser-Based AI Cover Tools for Beginners
If configuring Python environments and CUDA drivers sounds like a foreign language, browser-based tools are your fastest path to a finished cover. These platforms run voice conversion on cloud GPUs, so your personal hardware doesn't matter. You upload audio, pick a voice, and get results back without touching a terminal window.
MakeBestMusic's AI Voice Cover Generator stands out as a strong option for users who want to experiment with vocal styles quickly. It handles stem separation and voice conversion in a single workflow, letting you test different voice-song combinations without juggling multiple tools. The streamlined interface makes it particularly accessible for first-timers who want to hear results before committing to a deeper production process.
Other browser-based options include Voicify.ai, which offers a large library of community voice models and a straightforward upload-and-convert workflow, and Kits.AI, which leans more toward musicians who want royalty-free AI voices for original compositions. Each song cover maker in this category trades some granular control for convenience, but the quality ceiling has risen dramatically as cloud GPU infrastructure has improved.
Local Software Options for Advanced Users
Local tools give you full control over every parameter in the conversion pipeline. RVC WebUI is the gold standard here. It's free, open-source, and runs a Gradio interface where you load models, adjust pitch, tweak index rates, and process audio directly on your GPU. The trade-off? You need a dedicated NVIDIA GPU with at least 6 GB VRAM, a working Python environment, and patience for initial setup. RVC's real-time capabilities are impressive once configured. The model often processes audio faster than real-time on modern GPUs, with an RTX 3060 handling conversion roughly 1.5 times faster than CPU-only processing.
So-VITS-SVC is another local option that uses a diffusion-based approach for higher fidelity at the cost of slower inference and a steeper learning curve. It excels at preserving subtle vocal nuances but demands more VRAM and longer processing times. Applio wraps RVC's core engine in a friendlier interface with built-in training tools, making it the best middle ground for users who want local control without raw command-line work.
Which Method Is Right for Your Skill Level
The table below breaks down the most popular options across both categories so you can match a song cover creator to your specific needs:
| Tool Name | Method | Ease of Use | Quality Ceiling | Cost | Best For |
|---|---|---|---|---|---|
| MakeBestMusic AI Voice Cover Generator | Browser | Very Easy | High | Free / Premium tiers | Beginners wanting fast results and vocal style experimentation |
| Voicify.ai | Browser | Easy | High | Free tier / Subscription | Casual users exploring large model libraries |
| Kits.AI | Browser | Easy | Medium-High | Free tier / Subscription | Musicians seeking royalty-free AI voices |
| RVC WebUI | Local | Moderate | Very High | Free (open-source) | Advanced users who want full parameter control |
| Applio | Local | Moderate | Very High | Free (open-source) | Intermediate users who also want to train custom models |
| So-VITS-SVC | Local | Difficult | Very High | Free (open-source) | Audio engineers prioritizing maximum vocal fidelity |
A practical approach? Start with a browser-based ai cover generator to test your song choice and voice model pairing. If the results excite you and you want finer control, graduate to a local ai song cover generator like RVC WebUI or Applio. Many experienced creators use both: browser tools for rapid prototyping and local software for final production-quality renders.
Whichever tool you pick, the real magic happens in the settings you dial in during conversion. Default parameters produce decent output, but understanding what each knob actually does is what separates passable covers from ones that genuinely fool listeners.
Step 5: Run the Voice Conversion and Adjust Settings
Default settings produce average results. Every voice model and source song combination responds differently to conversion parameters, and learning what each setting actually controls is the difference between a flat, robotic output and a cover that makes people do a double-take. Whether you're figuring out how to make an ai cover song for the first time or refining your hundredth project, these parameters deserve your attention.
Key Voice Conversion Parameters Explained
When you run voice conversion in any RVC-based tool, you'll encounter a handful of settings that directly shape your output. Here's what each one does and why it matters:
Pitch Shift (Transpose) adjusts the tonal register of the converted voice. Negative values lower the pitch, positive values raise it. You'll almost always need to modify this to match the target voice model's natural range. For example, converting a female vocal to a male voice model typically requires a shift of -6 to -12 semitones. Decimal values like -4.3 are supported for fine-tuning.
Search Feature Ratio (Index Rate) controls how much influence the model's .index file has on the output. The .index file stores real acoustic patterns from the target speaker's training data, essentially a fingerprint of their unique timbre. Higher values pull more of those stored characteristics into the conversion, making the output sound more like the target voice. Lower values reduce that influence, which can help if the .index contains noise or artifacts from imperfect training data.
Volume Envelope (Remix Mix Rate) determines whether the output matches the loudness of your input audio or the loudness of the model's original training data. A value closer to 0 preserves the input's dynamics. A value closer to 1 shifts toward the model's native volume profile. For most song ai cover projects, keeping this near 0 maintains the natural dynamics of the original performance.
Protect Voiceless Consonants suppresses breath sounds that can cause artifacting during conversion. Lowering the value removes more breath noise, but pushing it too far makes the voice sound inhuman and clips parts of words. A value of 0.5 disables this feature entirely.
| Parameter | Function | Recommended Range | Too High | Too Low |
|---|---|---|---|---|
| Pitch Shift | Adjusts vocal register to match target voice | -6 to +6 semitones | Chipmunk effect, unnatural strain | Muddy, unnaturally deep tone |
| Index Rate | Controls influence of model's stored vocal characteristics | 0.3 to 0.75 | Introduces noise/artifacts from training data | Generic output that lacks the target voice's identity |
| Volume Envelope | Balances output loudness between input and model | 0 to 0.25 | Unnatural volume shifts, lost dynamics | N/A (0 simply preserves input volume) |
| Protect Consonants | Suppresses breath artifacts | 0.33 to 0.5 | Feature disabled (0.5), breath artifacts remain | Robotic, clipped consonants |
Recommended Settings for Your First AI Cover
If you're learning how to make an ai song cover and want a reliable starting point, these values work well across most voice models:
- Pitch Shift: Start at 0 if the source and target voices share a similar range. Adjust in increments of 1-2 semitones until the tone sounds natural.
- Index Rate: Begin at 0.5. If the output sounds too noisy or has strange textures, drop to 0.3. If it sounds too generic, push toward 0.7.
- Volume Envelope: Leave at 0 to preserve the original song's dynamics.
- Protect Consonants: Set to 0.33 as a starting point. Only lower it if you hear distracting breath sounds.
- Pitch Extraction Algorithm: Use RMVPE. It's fast, reliable, and handles most vocal styles well. Switch to Crepe only if you have extremely clean audio and want slightly more precision with soft or breathy voices.
These aren't magic numbers. Every song cover ai project requires some experimentation. Run a short 30-second clip first, listen critically, adjust one parameter at a time, and re-run until the output sounds right. Changing multiple settings simultaneously makes it impossible to identify what's helping and what's hurting.
How to Use Browser Tools for Quick Conversion
Local software like RVC WebUI exposes every parameter listed above, giving you granular control over the conversion process. But if you're using ai to make music covers without wanting to configure each setting manually, browser-based tools simplify the experience considerably.
MakeBestMusic's AI Voice Cover Generator lets you experiment with vocal styles and hear results quickly without needing to understand the technical parameters behind the scenes. This makes it ideal for testing different voice-song combinations before committing to a full production workflow in local software. You can rapidly audition how a voice model pairs with your chosen track, then move to RVC for fine-tuned control if the pairing shows promise.
The practical workflow many creators follow: use a browser tool to validate that your source song and voice model work well together, then switch to local software only when you need precise parameter adjustments for a final, polished render. This saves hours of configuring settings on combinations that were never going to sound good in the first place.
Even with perfect parameters, raw AI vocal output rarely sounds finished. The converted voice needs to sit naturally inside the instrumental mix, which requires a different set of skills entirely.
Step 6: Post-Process and Polish Your Final Cover
A raw AI vocal conversion sitting next to an instrumental track isn't a finished music ai cover. It's two disconnected elements that happen to share the same song. The vocal sounds like it was recorded in a vacuum, the levels don't match, and the tonal character feels detached from the backing track. Post-processing is where you stitch these pieces into something that sounds like a single, cohesive recording.
Mixing Your AI Vocal Back with the Instrumental
The goal here is straightforward: make the converted vocal sound like it belongs inside the instrumental, as if both were recorded in the same session. This requires attention to volume balance, stereo placement, and spatial context. Follow this workflow to get from raw output to polished audio cover:
- Import both stems into a DAW. Place the AI vocal and the separated instrumental on separate tracks. Align them at the same start point so timing stays locked.
- Set initial volume balance. Pull the vocal fader down until it sits just below the instrumental, then raise it slowly until the voice feels present without overpowering the music. A good vocal cover sits slightly forward in the mix but never dominates it.
- Pan the vocal center. Lead vocals belong dead center in the stereo field. Your instrumental should already have its own stereo spread from the original mix.
- Apply gentle compression. AI vocals often have unnaturally consistent dynamics. A light compressor (2:1 ratio, medium attack, medium release) smooths any remaining peaks while letting the performance breathe naturally.
- Add EQ to carve frequency space. Cut competing frequencies in the instrumental where the vocal needs room, typically the 2-5 kHz presence range. This prevents the voice from fighting with guitars, synths, or other midrange elements.
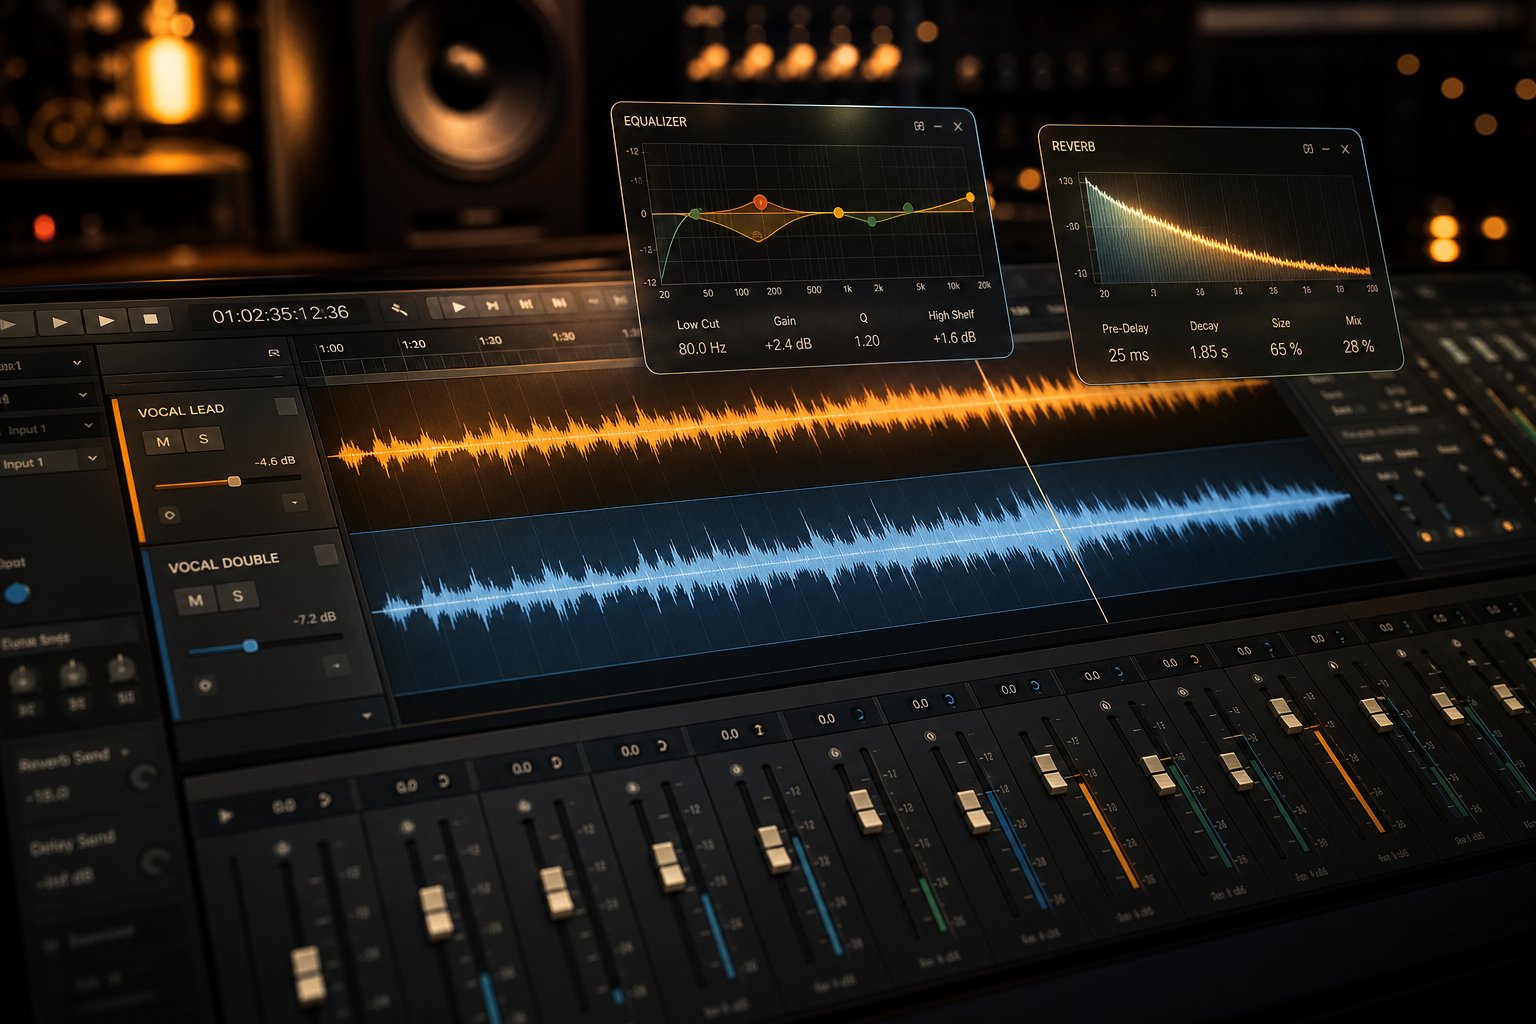
- Apply reverb and delay to match the track's space. This is the single most important step for making the vocal sound like it belongs in the song rather than pasted on top of it.
- Normalize and export. Bring the final mix to -1 dB peak or -14 LUFS integrated loudness for streaming platforms, then bounce to WAV or high-quality MP3.
Essential EQ and Reverb Settings for Natural Sound
EQ and reverb do the heaviest lifting when blending an AI vocal into a track. Without them, even a perfect voice conversion sounds like someone is trying to sing cover vocals through a phone speaker held up to a boombox.
EQ approach: Start by applying a high-pass filter on the vocal around 80-100 Hz to remove low-end rumble that muddies the mix. Then make a small cut around 200-300 Hz if the voice sounds boxy. A gentle boost between 3-5 kHz adds clarity and presence. As Sonarworks notes, frequency carving with complementary EQ moves, boosting in the vocal what you've slightly cut in competing instruments, is especially important in that 2-5 kHz range where vocals and instruments fight for prominence.
Reverb approach: The key insight is to send both the AI vocal and key instruments to the same reverb bus. This places everything in a shared acoustic space, which is what makes a mix sound like a real recording rather than a collage. Use a plate or room reverb with a decay time between 1.0 and 2.5 seconds depending on the song's tempo. Cut the reverb's low end below 200 Hz with a high-pass filter to prevent muddiness, and roll off highs above 8-10 kHz to keep the reverb tail smooth rather than harsh.
Adjust the reverb send level until you can barely hear it consciously, then back off slightly. The reverb should be felt more than heard. If listeners notice the reverb, it's too much.
Free Tools for Post-Processing Your Cover
You don't need a $600 DAW to produce polished ai cover music. Several free options handle everything described above:
- Audacity is free, cross-platform, and handles basic EQ, compression, reverb, and volume normalization. Its Filter Curve EQ lets you shape frequencies visually. The interface isn't glamorous, but it covers every essential post-processing task for a vocal cover project.
- GarageBand (macOS/iOS only) offers a more intuitive multitrack environment with built-in reverb, EQ, and compression plugins. Its visual mixer makes balancing vocals against instrumentals more approachable for non-engineers.
- Cakewalk by BandLab (Windows) is a full-featured professional DAW available completely free. It includes advanced mixing tools, automation, and plugin support that rival paid software.
Whichever tool you use, the principle stays the same: treat the AI vocal exactly as you'd treat a human recording. Give it space in the frequency spectrum, place it in a believable acoustic environment, and match its dynamics to the energy of the instrumental. These small moves are what transform a novelty experiment into a music ai cover that genuinely fools listeners.
Of course, not every conversion comes out clean on the first try. When the output sounds off despite good settings and solid source material, a structured troubleshooting approach saves you from starting over blindly.
Step 7: Troubleshoot Common AI Cover Problems
You followed every step, dialed in your settings, and hit convert. The result sounds... wrong. Maybe the voice warbles on sustained notes, or the output has a metallic sheen that screams "computer-generated." Knowing how to make ai covers of songs is one thing. Knowing what to do when the output falls flat is what separates people who give up from those who produce convincing results.
Most problems trace back to a handful of root causes. The table below covers the issues you're most likely to encounter and how to fix each one:
| Problem | Likely Cause | Solution |
|---|---|---|
| Robotic, metallic vocal tone | Instrumental bleed in the vocal stem feeding non-vocal frequencies into the model | Re-run stem separation with a higher-quality model (MDX-Net in UVR). Ensure the isolated vocal has zero audible instrumentation before converting. |
| Pitch warbling or unstable notes | Pitch extraction algorithm struggling with the source vocal's style or quality | Switch from Harvest to RMVPE for pitch extraction. If already using RMVPE, check that your source vocal doesn't contain heavy vibrato or pitch correction artifacts. |
| Harsh sibilance or "fizzy" high end | Index rate set too high, pulling noisy training data characteristics into the output | Lower the index rate to 0.3-0.4. Apply a de-esser in post targeting 5-8 kHz. |
| Muffled, low-clarity output | Source audio is low bitrate (128 kbps MP3 or worse), stripping high-frequency detail the model needs | Replace source with a WAV or 320 kbps file. Never convert from audio ripped at low quality. |
| Unnatural breathing sounds or clicks | Protect consonants value set too low, clipping transients during conversion | Raise the protect consonants parameter to 0.33-0.4. Alternatively, manually remove breath sounds from the source vocal before conversion. |
| Voice sounds nothing like the target | Voice model mismatch: the source song's vocal range sits far outside the model's trained range | Adjust pitch shift to bring the source closer to the model's natural register. If shifting more than 6 semitones, choose a different song or model pairing instead. |
| Garbled or distorted output on certain words | Overlapping vocals or harmonies in the source that the model tries to convert simultaneously | Use a source track with a single, clean lead vocal. Remove backing vocals with a second stem separation pass before converting. |
Fixing Robotic Artifacts and Glitchy Audio
Robotic artifacts are the most common complaint, and they almost always point upstream rather than at the voice model itself. According to Sonarworks' research on AI voice artifacts, these anomalies occur when algorithms over-quantize vocal characteristics, stripping away the micro-variations that make human voices sound natural. In the context of AI covers, the usual culprit is contaminated input: instrumental frequencies leaking into the vocal stem get interpreted as voice data, producing that telltale metallic sheen.
If your stem separation looks clean but the output still sounds artificial, check your index rate. Pushing it above 0.75 forces the model to rely heavily on stored training data patterns, which can introduce noise and texture artifacts from imperfect training recordings. Dropping to 0.4-0.5 often cleans things up immediately. For persistent issues, a gentle parametric EQ cut in the 2-5 kHz range during post-processing can tame the harshest digital artifacts without dulling the vocal.
Solving Pitch Problems and Vocal Mismatch
Pitch glitches manifest as wobbly notes, sudden octave jumps, or a strained quality on high passages. These happen when the pitch extraction algorithm loses track of the fundamental frequency, especially on breathy phrases, vocal runs, or notes with heavy vibrato. RMVPE handles most singing styles reliably, but it can still stumble on extremely fast melismatic passages or whispered sections where the pitch signal is weak.
Voice mismatch is a different beast entirely. When you're learning how to do ai covers of songs, it's tempting to force unlikely pairings: a deep baritone model on a soprano track, or a gentle acoustic voice on aggressive rap delivery. These combinations require extreme pitch shifts that warp formants beyond recognition. The fix isn't a parameter tweak. It's choosing a better pairing. If you need to shift more than five or six semitones to make a combination work, the song and model simply aren't compatible. Pick a track closer to the model's natural range, and the conversion will sound dramatically more convincing with zero additional effort.
When to Start Over vs When to Fix in Post
Not every problem is worth patching. A useful rule: if the issue is audible on more than 30% of the track, start over with different settings or a different source file. Post-processing can rescue isolated glitches, a single warbled note, a brief click, or a slightly harsh passage. But if the entire vocal sounds robotic or the pitch drifts consistently, no amount of EQ and reverb will save it. You're better off re-running the conversion with adjusted parameters or reconsidering your song-model pairing entirely.
For those figuring out how to make ai covers songs that actually fool listeners, the willingness to iterate is everything. Professional results rarely come from a single pass. Expect to run two or three conversions with slightly different settings before landing on the version that clicks. Treat each attempt as diagnostic information rather than a failure, and you'll converge on quality output faster than you'd expect.
Troubleshooting gets you to "good." The next level, covers that sound genuinely professional rather than merely passable, requires a different set of creative and technical strategies.
Pro Tips for AI Covers That Sound Professional
A technically clean AI cover and a genuinely impressive one are separated by a handful of creative decisions that most tutorials never mention. The steps above get you to a solid baseline. These techniques push your output into territory where listeners stop analyzing and start enjoying, which is the entire point if you want to learn how to make ai music covers that hold up under scrutiny.
Advanced Techniques for Natural-Sounding Results
The single biggest giveaway of an AI-generated vocal is a flatness in emotional dynamics. Real singers vary their intensity, drift slightly off pitch on purpose, and shift tonal color between verses and choruses. AI conversions tend to smooth these micro-variations into a consistent, almost too-perfect performance. Counteracting that artificial polish is where advanced technique lives.
- Match the key to the model's training data. Every voice model has a sweet spot, the key range where it was trained most heavily. If the original song already sits in that range, you skip pitch shifting entirely, and zero pitch shift always produces the most natural output. Research the target artist's most common keys and choose source songs that align.
- Layer subtle harmonies from the same model. Run the main vocal through conversion, then process backing harmonies separately at slightly different index rates (drop 0.05-0.10 lower than your lead). This creates the illusion of a real singer doubling their own voice rather than a single AI render pasted across tracks.
- Use pitch correction sparingly on the output, not the input. Light auto-tune applied after conversion (with a slow retune speed of 40-60 ms) smooths occasional pitch wobbles without flattening the performance. Heavy correction before conversion confuses the pitch extraction algorithm and produces worse results.
- Automate subtle volume rides on the vocal. Real vocal performances get louder on choruses and softer on verses. If your AI output has flat dynamics, manually draw volume automation curves in your DAW that mirror the emotional arc of the song. This three-minute effort makes a disproportionate difference.
- Process different song sections independently. Verses, choruses, and bridges often benefit from slightly different conversion settings. A verse might sound best at an index rate of 0.4 for intimacy, while the chorus needs 0.6 for fuller presence. Split your vocal stem into sections, convert each separately, and reassemble them in your DAW.
- Add a touch of saturation. A gentle analog saturation plugin on the vocal bus introduces harmonic overtones that mimic the warmth of a real microphone chain. This fills in the sterile gaps that digital conversion sometimes leaves behind.
These aren't theoretical suggestions. Creators producing the most convincing AI covers on YouTube and TikTok use variations of every technique listed here. The difference between their work and a beginner's first attempt isn't better AI. It's better production instincts applied after the AI does its part.
Creative Applications Beyond Simple Voice Swaps
Voice swapping is only the starting line. Once you're comfortable with the core workflow, the creative possibilities expand dramatically.
Genre-swapping is one of the most compelling applications. Take a hip-hop track, slow it down, re-record or generate an acoustic instrumental, and convert the vocal to a folk singer's voice model. The result isn't just a different voice on the same song. It's an entirely reimagined piece of music that recontextualizes the original lyrics. Some of the most viral famous song remakes on social media follow exactly this formula, turning pop anthems into jazz ballads or country hits into electronic bangers.
An ai cover mashup takes things further by combining elements from multiple songs. You might extract the vocal from one track, the instrumental from another, and apply a third artist's voice model to the result. These Frankenstein creations work surprisingly well when the tempos and keys align, and they showcase creative vision rather than just technical ability.
Duet creation opens another door. Convert the same vocal into two different voice models, pan them slightly left and right, and you've manufactured a duet between artists who never recorded together. The key is choosing models with complementary tonal qualities, pairing a warm baritone with a bright tenor, for example, rather than two voices that occupy identical frequency space.
For producers and songwriters, AI covers also serve as powerful demo tools. You can pitch a song concept to a label or collaborator with a vocal that approximates the intended artist's style, giving stakeholders a far more compelling preview than a rough scratch vocal ever could. Recording Academy CEO Harvey Mason Jr. noted that "every" songwriter and producer he knows has used generative AI music tools in their workflow, and demo creation is one of the most common professional applications.
Free vs Paid Options and What You Actually Need
Here's a reality check that most guides skip because they're trying to sell you something: you can produce high-quality AI covers entirely for free. Every critical step in the pipeline has a no-cost option. UVR handles stem separation. RVC WebUI handles voice conversion. Audacity handles post-processing. Weights.gg provides voice models. The entire chain from source audio to finished cover costs nothing but time and a halfway-decent GPU.
So when should you actually pay? A free ai cover generator or local tool makes sense when you're learning, experimenting, or producing covers casually. Paid tools earn their price in three specific scenarios:
- You value speed over control. Browser-based platforms that bundle separation, conversion, and basic mixing into one click save significant time. If you're producing covers frequently, the hours saved justify a subscription.
- You need legally licensed voices. Platforms like Kits.AI offer ethically sourced, royalty-free voice models with proper artist consent and revenue-sharing arrangements. If you're releasing covers commercially, this legal clarity matters more than any technical feature.
- You want consistent, branded output. Training a custom voice model requires GPU time, clean datasets, and technical knowledge. Paid platforms that offer custom model training as a service remove that friction, particularly useful for content creators who need a consistent AI vocal identity across dozens of projects.
A practical music cover maker workflow for most people combines free and paid tools strategically. Use free software for the steps where you want maximum control (stem separation, post-processing) and paid platforms for the steps where convenience matters most (quick voice conversion testing, accessing licensed models). You don't need to commit to one ecosystem. Cherry-pick the best tool for each stage.
The landscape for how to make ai cover songs continues to evolve rapidly. Modern voice conversion can capture not just timbre but emotional inflection, breathing patterns, vibrato, and phrasing, and custom model training has dropped from ninety minutes to under five. Tools that felt cutting-edge six months ago are already being surpassed. The creators who stay ahead aren't chasing every new platform. They're building strong fundamentals in audio preparation, model selection, and post-production, skills that transfer regardless of which ai cover free tool or paid service rises to the top next. Master the craft, and the tools become interchangeable.